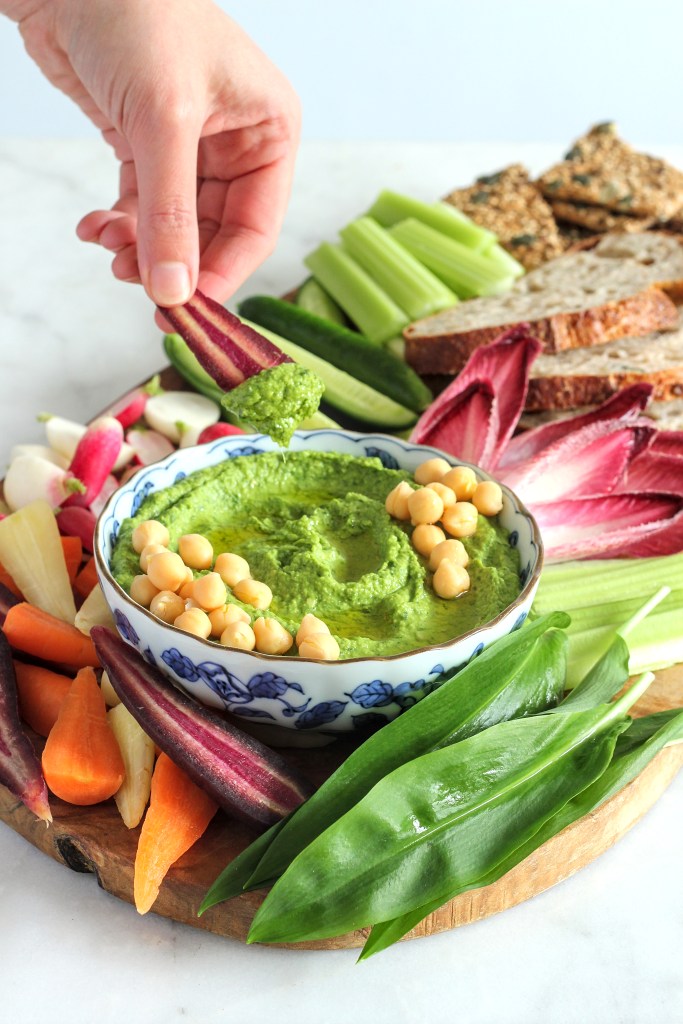
I’ve had a few requests for some wild garlic recipes which are easy, so I’ve made this Wild Garlic Hummus which couldn’t be simpler for anyone wanted to use wild garlic which has arrived in their weekly veg delivery box. You can choose how much wild garlic you want to use, and obviously the more you use, the greener it will be as well as the stronger the garlic taste – you can always add more!
Ingredients
50-100g wild garlic
1 tin of chickpeas
Juice of 1-2 lemons
50g tahini
2tbsp extra virgin olive oil
Method
Add everything to a blender and blend to a desireable consistency, adding extra lemon juice of olive oil where needed.
Serve with your favourite crudités, bread, crackers, storing any leftovers in an airtight container in the fridge for up to 7 days.
I’ve had a few requests for some wild garlic recipes which are easy, so I’ve made this Wild Garlic Hummus which couldn’t be simpler for anyone wanted to use wild garlic which has arrived in their weekly veg delivery box. You can choose how much wild garlic you want to use, and obviously the more you use, the greener it will be as well as the stronger the garlic taste – you can always add more!
Ingredients
50-100g wild garlic
1 tin of chickpeas
Juice of 1-2 lemons
50g tahini
2tbsp extra virgin olive oil
Method
Add everything to a blender and blend to a desirable consistency, adding extra lemon juice or olive oil where needed.
Serve with your favourite crudités, bread, crackers, storing any leftovers in an airtight container in the fridge for up to 7 days.
If you’ve been on Instagram for just a minute you will probably have seen these trending pizza sandwiches. They’re delicious. I highly recommend you make these! I’ve used my sourdough pizza base recipe, and then any surplus dough I used to make extra pizzas for easy mid-week dinners!
Serves 3
Ingredients
Half batch of sourdough pizza base, divided into 3 small balls, rested for 30 minutes before cooking (or make a full batch and use any leftover dough for pizzas)
Preheat the oven to maximum temperature with your pizza stone and allow to fully heat.
Use a little rice flour and shape the dough into a disk in the same way you would for a pizza. Brush half the surface with 1 tsp of the olive oil, and fold the unbrushed side over the top. Transfer to the pizza stone to cook for 6-8 minutes till golden and crispy.
Once cooked, generously spread the wild garlic pesto on the inside of the pizza dough, and fill with rocket, tomatoes, burrata and basil leaves.
I love making this sticky and sweet salmon teriyaki, and cutting the salmon into small cubes means that there are more sticky corners where the sugar from the honey can caramelise on the fish. It also means that you can cook the salmon in 10 minutes so dinner can be served quicker!
In the UK we don’t consume enough oily fish, and I think one of the major barriers to this is that people don’t like the taste of fish. Therefore, I think if we can make a really delicious recipe using fish, yes with some added sugars, then there are still going to be benefits gained from this.
Serves 4
Ingredients
4 tbsp light soy sauce
2 tbsp honey
2 tbsp sake
4 tbsp mirin
1 tsp grated ginger
1 garlic clove, grated
500g salmon, descaled and cut into cubes
To serve
Cooked brown sushi rice
Pickled carrots
Wakame
Pak Choi
Edamame beans
Radish
Coriander
Chillis
Spring onions
Sesame seeds
Method
Heat the honey, soy sauce, mirin and sake in a pan together till reduced to half the volume, add the ginger and garlic towards the end. Allow to cool.
Preheat your oven to 225°C fan/ and 250°C convection
Mix the salmon with half the teriyaki sauce, reserving the remaining half for later. Line a baking tray and spread the salmon out evenly, spacing the pieces out.
Bake in the oven for 8-10 minutes till the edges of the salmon are sticky and charred.
Serve the salmon over the rice alongside all the veg, adding a final drizzle of teriyaki sauce over the top.
I had a very similar salad in a restaurant recently for a friend’s birthday. I thought I could recreate it, with a slight nutritional twist whereby each serving provides you with an actual portion of salad! It’s just as delicious as the restaurant, but knowing it’s providing that little bit of extra nutrition makes me forgive the fact that I’m actually eating a double portion of cheese in one go.
Serves 2
Ingredients
6 large leaves of radicchio (160g)
1 tbsp pomegranate molasses
1 tbsp red wine vinegar
2 tbsp extra virgin olive oil
30g pumpkin seeds
30g pomegranate seeds
1 ball of burrata
Method
Mix the pomegranate molasses, vinegar and olive oil together in a small bowl
Tear the radicchio leaves into a more manageable size and arrange on a large plate.
Scatter the seeds over the top before placing the burrata in the middle and drizzling everything with the prepared salad dressing.
Radicchio and Burrata Salad
Per serving: 427kcal/ 35g fat/ 12g saturated fat/ 17g carbohydrates/ 2.3g fibre/ 10g protein
Rather than growing a carving pumpkin, I prefer to grow squash as they’re a bit more tasty than standard carving pumpkins. I’m also all about the guts, so in this recipe I’m using the whole of the edible pumpkins, with just the inedible stalk and pumpkin bum, aka the blossom end, left for the compost bin. I keep the skin of the butternut squash on the flesh – this helps save time, and prevent unnecessary food waste, but also a lot of people injure themselves when peeling squash so let’s keep the gore to fake blood.
This is also perfect to make if you are cooking something else in the oven already. You can roast the vegetables in advance, and then when you are ready turn them into the soup at a later time – just allow everything to come back to the boil for a few minutes before blending.
If you don’t have a squash to hand but still want to make this soup you can opt for pre-prepared butternut squash from the freezer which can be more convenient for some people. If this is the case try using green pumpkin seeds you can buy in the shops.
Squash and pumpkins are excellent sources of beta-carotene, which our body converts into vitamin A. We need this vitamin to help maintain healthy skin, a healthy immune system, and also help our eyes to see in the dark! Or at least that’s what the kid’s like to hear most often!
I love serving my soup with some tomato cheese on sourdough toast! It’s such a treat, and helps make this soup a balanced meal.
Makes 6 generous servings
Ingredients
1 large butternut squash, cut into large chunks – mine was 1.3kg once I had prepared it
3 onions, quartered
1 head of garlic, the very top removed
2.5 tbsp extra virgin olive oil
150g red lentils
1 stock cube, I used a vegetable one
Herbs for garnishing e.g. flat-leaf parsley or chives
Method
Preheat the oven to 180°C fan/ GM6
To a large baking tray, add the cubed butternut squash, quartered onions, garlic bulb, and 2 tbsp extra virgin olive oil. Mix to evenly coat everything with oil, and place the garlic in the middle of the tray to prevent it from burning. Roast in the oven for 45 minutes till the veg start to turn golden brown.
Meanwhile, prepare the squash seeds by placing the squash “guts” into a bowl and adding some water. Loosen the seeds from the stringy flesh before placing on a clean teatowel to thoroughly dry. Place the seeds into a small baking tray, adding the remaining half tbsp extra virgin olive oil and mixing to evenly coat. Place the tray at the bottom of the oven and roast for 10-15 minutes till deep golden in colour and crispy.
While the veg is roasting, bring around 600ml water to the boil and add the lentils and stock cube. Cook the lentils for around 10 minutes till soft.
Once the veg is cooked, add it to the pan with the now cooked lentils, and squeeze the garlic out of the paper. Deglaze the pan with boiling water, and then top up the water in the pan so it covers the vegetables. In total, you will need to add around 1.8l of water. Bring everything back to a boil and cook for 5 minutes before blending into a soup of your desired consistency, adding more water to thin the soup if desired, and seasoning with pepper to taste.
Serve the soup piping hot, dressed with a little extra olive oil if desired, and scattered with fresh herbs and crispy seeds.
Roasted Butternut Squash and Red Lentil Soup
Per serving*: 285kcal/ 8.1g fat/ 1.2g saturated fat/ 37g carbohydrates/ 11g fibre/ 11g protein
*nutritional analysis using pumpkin seeds, which are different to the seeds found in a squash
This recipe is for anyone who is clinging to these last few warm days of summer. It’s the end of my tomato growing season, my courgette plants are on the brink of shutting down, and the nights are slowly drawing in. So here’s a comforting summer-style galette making the most of those wonderful tomatoes. Other veg that would work well in place of tomatoes here include courgettes, Swiss chard, aubergine, peppers, kale, leeks or even onions – most of these would need cooking either partially, or fully, before placing on top.
Serves 6 as a starter or 4 as a main
Ingredients
65g cold unsalted butter, cut into cubes
160g wholemeal plain flour
3 tsp fresh thyme leaves
100g soft goats cheese
100g cream cheese
2 tsp fresh oregano leaves
1/4 tsp white pepper
325g sliced tomatoes
1 egg, beaten
40g hard goats cheese
Method
Make the pastry by combining the butter, flour and 1 tsp thyme leaves together till it resembles breadcrumbs with your fingertips. Then add 35-40ml ice cold water and bring together to form a dough. Cover and refrigerate for 30 minutes.
Meanwhile, mix the soft goat cheese, cream cheese, 1 tsp thyme, 1 tsp oregano and pepper together till smooth.
Preheat the oven to 180°C fan/ 200°C convection
Roll the dough out to make a large disk approximately 25cm diameter and transfer it onto a lined baking sheet. Spread the cheese mixture over the base, leaving a 1-inch border around the edge. Layer on the cut tomatoes.
Gently fold the edges over onto the filling. Brush the exposed pastry crust with the beaten egg and dust the whole galette with the remaining herbs and hard goats cheese, paying particular attention to the pastry edge.
Bake in the oven to 20 minutes till the pastry turns a deeper golden colour and the tomatoes have softened.
Delicious served warm or cold for a packed lunch.
I love serving my galette with a side salad with yet more tomatoes
Per sixth: 310kcal/ 20g fat/ 13g saturated fat/ 19g carbohydrates/ 3.4g fibre/ 9.9g protein
Here’s my super easy Summer Quinoa Salad recipe which incorporates all of these concepts in one dish.
Serves 4 as a main
Ingredients
200g quinoa
30ml extra virgin olive oil
15g chives, chopped
15g flat-leaf parsley, chopped
200g cucumber, cubed
250g cherry tomatoes, chopped
1 tin of chickpeas, drained and rinsed
Juice of 2 lemons
1 large avocado (use some of the lemon juice to prevent it from browning)
80g black olives, roughly chopped
20g pumpkin seeds
20g sunflower seeds
Method
Add the quinoa to a pan with 400ml of cold water. Bring to a boil and allow to simmer for 12-15 minutes, or until all the water is absorbed. Remove from the heat and cover with a lid for 5 minutes before fluffing with a fork. Allow to cool.
Add the cooked quinoa to a large bowl along with all of the remaining ingredients and mix together.
Serve, remembering to put any spare salad away in a Tupperware in the fridge for the next day.
Per serving: 530kcal/ 29g fat/ 4.4g saturated fat/ 44g carbohydrates/ 11g fibre/16g protein
What do Jerusalem artichokes, garlic, onions and leeks all have in common? They’re all prebiotics, which means they help feed the good bacteria in your gut.
If you’re not used to eating lots of prebiotics in your diet, you may well feel a little gassy after, but that’s your gut microbiota enjoying these special fibres. When they enjoy them, they ferment them, producing extra gas which you may notice either as bloating or flatulence. All good things, but always good to know in advance of this happening.
Serves 10
Ingredients
2 tbsp extra virgin olive oil
2 large onions, sliced
2 leeks, sliced
4 sticks of celery, sliced
5 garlic cloves
400g celeriac, roughly chopped
800g Jerusalem artichokes, roughly chopped
250ml white wine
1 stock cube dissolved in 1.2l hot water
1 bunch of thyme
150ml double cream
To serve
Extra chopped herbs e.g. thyme leaves, chives, flat leaf parsley
Sourdough bread
Method
In a large pan, add the oil, onion, leeks and celery and cook for 5 mintues till soft.
Add the garlic, celeriac and Jerusalem artichokes followed by the wine, stock and thyme. Cook till the vegetables are soft.
Remove the woody herb stems before blending with the double cream. Season to taste with pepper.
Serve sprinkled with extra herbs and pepper and a slice of sourdough bread
Prebiotic Winter Soup
Per serving of soup: 204kcal/ 11g fat/ 5.6g saturated fat/ 15g carbohydrates/ 5.1g fibre/ 3.4g protein
This was a childhood recipe I would make it every weekend. I loved this recipe so much, but the original recipe used cow’s milk. I’ve turned it vegan by using some unsweetened soya milk and rapeseed oil in place of the butter. I still get that nostalgic feeling when eating this vegan version.
I’m using mushrooms which naturally contain vitamin D. I’ve written about this before where I talked about exposing shop-bought mushrooms to sunlight to make your own vitamin D mushrooms at home. You can buy mushrooms which have already been exposed to UVB rays, and therefore already contain vitamin D2. This can be useful if it’s not a sunny day or you don’t have time to let your mushrooms make vitamin D.
Serves 1
Ingredients
10g rapeseed oil
100g vitamin D mushrooms
1 tbsp plain flour
1 tbsp mushroom ketchup
150ml unsweetened fortified soya milk
1 slice of toast
Method
In a saucepan, heat the oil and fry the mushrooms till they release all their juices and they evapourate off.
Add the flour and mix into the mushrooms before adding the mushroom ketchup. Add the soya milk in a little bit at a time, stirring continuously to get a smooth sauce.
Once all the milk has been added, cook for a couple of minutes before serving piled high on a slice of toast
Use your leftover vegetable peelings from your Christmas Dinner to make these delicious No Waste Vegetable Fritters. They are so versatile in terms of what vegetables you want to use in them. I have used a combination of potato, parsnip, carrot and sprout peelings, but other suitable vegetables include onion, cabbage, kale, cauliflower (leaves included), broccoli, mushrooms or leeks.
Save the peelings in a Tupperware in the fridge for up to 3 days before making these fritters – you can adjust the gram flour (also known as chickpea flour or besan flour) and water to the weight of the vegetables.
Delicious served with a quick riata which can easily be adapted to vegan by using a plant-based yoghurt.
No Waste Vegetable Fritters
Makes around 8 fritters
Ingredients
2 tbsp rapeseed oil
400g vegetable peelings e.g. carrots, potatoes, parsnips and sprouts
1″ ginger, grated
1 clove garlic, grated
1 tsp nigella seeds
1.5 tsp cumin seeds
250g gram flour
Juice of 1 lemon
To serve
250g plain yoghurt of choice
100g grated cucumber
1 spring onion, chopped
1 handful fresh mint, chopped
Juice of half a lemon
Method
Preheat the oven to 200°C fan/ 225°C convection
In a large baking tray add the oil and preheat in the oven
In a large bowl add the remaining fritter ingredients and mix together with around 150ml water, adding extra water if needed to get a thick batter consistence.
Remove the tray from the oven and drop patties of the mixture into the hot oil, evenly spaced out. You should make around 7-8 fritters.
Cook in the oven for 10 minutes, before flipping over, gently pressing down and cooking for a further 12-15 minutes till golden brown and crispy.
Meanwhile, mix the raita ingredients together.
Once the fritters are cooked through, serve alongside the riata.
Per serving*: 198kcal/ 5.2g fat/ 0.7g saturated fat/ 25g carbohydrates/ 5.2g fibre/ 10g protein
No Waste Vegetable Fritters
*Nutritional analysis completed based on particular vegetables listed and plain low fat yoghurt.
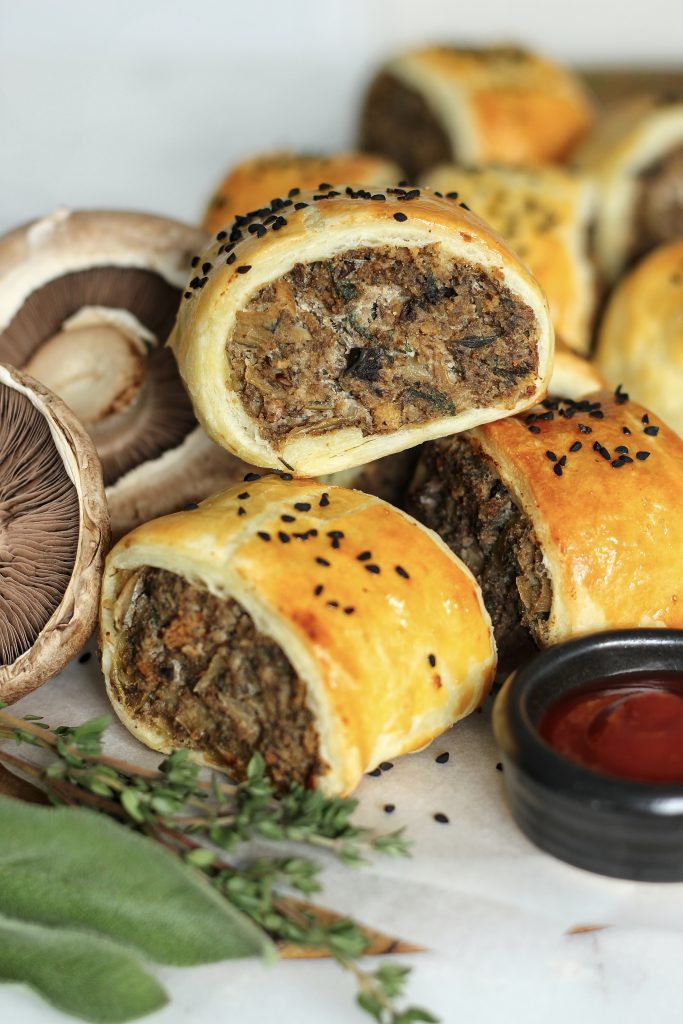
For me, sausage rolls come out 2 times during the year; picnics and Christmas! While I do love a meat-based sausage roll, I wanted to create something which non-meat eaters could also enjoy without simply turning to a ready-made vegetarian sausage. This also means I’m having the benefit of plant foods, and less processed red meat which we know can be bad for our health.
You can make a bigger batch of these, partially cook them for 15 minutes and then reheat before your guests arrive for 10 minutes. Alternatively, you can freeze them down for longer-term storage. Simply cook from frozen for 15-18 minutes till crisp and piping hot.
These are also perfect for young children as they are naturally lower in salt in comparison to most shop-bought sausage rolls. Additionally, they are a softer texture inside in comparison to meat, which might be more pleasing to younger children.
To make the sausage rolls egg-free, swap the egg glaze for a milk-wash glaze.
Makes 12
Ingredients
5g dried mushrooms
50ml boiling water
1 tbsp rapeseed oil
1 onion, finely sliced
2 garlic cloves, finely chopped
250g mushrooms, finely chopped
200g firm tofu
10 sprigs thyme
2 sprigs sage
1 tsp pepper
1/4 tsp nutmeg
250g ricotta
50g breadcrumbs
1 sheet puff pastry
1 egg, beaten
a few pinches of seeds e.g. nigella seeds, sesame seeds
Method
Pour the boiling water over the dried mushrooms to rehydrate them.
Meanwhile, heat the oil in a saucepan and cook the onion for 5 minutes over a low heat till soft and translucent. Add the garlic and cook for a further 2 minutes.
Add the fresh and rehydrated mushrooms to the onion mixture and cook till all the liquid evaporates off.
Add the tofu, herbs and spices and cook till dry again.
Drain any excess liquid off the ricotta. Add to a large mixing bowl with the breadcrumbs and the mushroom mixture. Mix well and allow to fully cool to fridge temperature.
Preheat the oven to 180°C fan/ 200°C convection
Meanwhile, cut the pastry sheet into 2 pieces through the longer edge to create two smaller rectangles. Shape the mushroom mixture into the centre of the two pieces of pastry, leaving a large gap on either long edge.
Using the egg, paint across one edge to act as glue. Take the edge without the egg on it and fold it over the mushroom mixture, rolling it onto the egg-washed edge to seal.
Cut each log into 6 pieces and place on a lined baking tray. Brush the tops with the remaining egg wash and sprinkle with seeds.
Bake in the oven for 25 minutes till golden brown and crispy.
Enjoy hot, or cold
Vegetarian Sausage Rolls
Per sausage roll: 255kcal/ 16g fat/ 7.3g saturated fat/ 14g carbohydrates/ 2.1g fibre/ 12g protein