This easy soup also doubles up as an easy pasta sauce – win win! It’s naturally vegan if using a suitable stock powder, and if you use a no added salt stock cube it is suitable for babies and toddlers.
Serves 6
Ingredients
600g pumpkin, skin on and cubed
2 large onions, cut into 8ths
2 sticks of celery, chopped
1 tin of cannellini beans
4 garlic cloves, skin left on
2 tbsp extra virgin olive oil
700ml no added salt stock
100ml boiling water
20g pumpkin seeds, finely chopped if serving to young babies
Method
Add the pumpkin, onion, celery, beans, garlic and olive oil to a large roasting tray.
Mix well before roasting in a preheated oven set to 180°C fan/ 200°C convection, stirring halfway through.
Once cooked, remove the garlic from its skin.
Bring the stock up to the boil and add the roasted vegetables, deglazing the roasting tin with 100ml boiling water.
Bring the mixture back up to a boil before blending till smooth.
Serve with a sprinkle of pumpkin seeds.
Option to serve as a pasta sauce by stirring through freshly cooked pasta. Delicious with a sprinkle of nutritional yeast which is a great source of B vitamins and zinc.
Serve as soup, pasta or baby-led weaning pasta finger food
Per serving of soup: 175kcal/ 8.5g fat/ 1.3g saturated fat/ 17.0g carbohydrates/ 6.0g fibre/ 4.8g protein
Feeling hot in this heatwave? Me too! So here’s one of my fun ways to help you keep cool this summer, and the good news is it’s good for you! Blended fruits with coconut milk make the perfect frozen popsicles. You could play around with the flavour combinations, but for me this is the summery flavour I’ve been craving to quench my thirst!
I’ve used a dairy free coconut milk alternative, but you could keep it vegan by using coconut milk from a tin. This might just make the popsicles a little creamier, so if you want to keep them as light and refreshing as possible, try the milk alternative drink.
These are suitable for all ages, including kids and younger children (they may like a little less lime so it’s not quite so sharp on the tastebuds), why not make a batch for the whole family to enjoy on a hot day.
Makes 6 100ml popsicles
Ingredients
300g fresh or frozen pineapple
250ml coconut milk alternative
Zest and juice of 2 limes
Method
Put the ingredients into a blender and blend till smooth.
Pour into your popsicle moulds and freeze for at least 8 hours.
Enjoy!
Pineapple, Lime & Coconut Popsicles
Per ice lolly : 43kcal/ 0.8g fat/ 0.5g saturated fat/ 8.8g carbohydrates/ 0.8g fibre/ 0.5g protein
This recipe was born from a sad cauliflower and a wilted bunch of coriander left over at the end of the week which needed to be used up. It got a resounding “I rate this” from my partner as we ate leftovers the next day. Absolutely none of the cauliflower is wasted, I simply adore cauliflower leaves and for anyone who has not tried them, this is the perfect dish to utilise them.
This is a fantastic way to use up any other vegetables too. Mix and match with other cruciferous vegetables such as broccoli, Brussel sprouts or even kale, or use other vegetables such as courgette, aubergine or green beans.
Serves 6
Ingredients
200g yellow split peas
1 tsp mustard seeds
1 tsp ground coriander
2 tbsp rapeseed oil
1 large or 2 small onions, sliced
2″ piece of ginger, peeled and grated
1 red chilli, sliced (or to taste)
60g skin-on almonds, roughly chopped
1 cauliflower head, cut into florets and leaves
400ml coconut milk
2 tsp ground turmeric
200g fresh tomatoes, roughly chopped
20g coriander, roughly chopped
To serve
Cooked rice
Method
Boil the split peas in plenty of water for 25 minutes, till cooked through but still firm.
Separately, in a large pan add the mustard seeds, ground coriander and oil over a medium heat.
When the mustard seeds start popping add the onion, ginger, chilli and almonds. Cook for 2-3 minutes.
Add the cauliflower, coconut milk, turmeric, tomatoes and half of the coriander.
Drain the cooked yellow split peas, reserving 50ml of cooking liquid, and to the cauliflower mix. Cook together for 5 minutes.
Serve with rice and the remaining coriander.
Per serving: 387kcal/ 17.3g fat/ 2.2g saturated fat/ 22.9g carbohydrates/ 16.7g fibre/ 16.8g protein
This is the recipes for those of you who already follow a vegan lifestyle. It’s also something for those who are doing Veganuary for the first time. It’s also perfect for anybody who is looking to increase their plant-based diet without necessarily being 100% vegan all the time.
This would work well with other vegetables such as leeks, celery, courgettes, or if mushrooms are not your thing use some fresh or tinned tomatoes which will cook into a tomato based sauce for the lentils to sit in.
Leaving the skin on the potatoes for the mash will make the dish quicker to prepare. You’ll also prevent any food waste as well as keep in the maximum fibre content.
Serves 2
Ingredients
60g puy lentils
35ml extra virgin olive oil
1 large onion, finely diced
1 garlic clove, finely chopped
180g mushrooms, finely diced
1/2 tsp vegan stock powder
A few sprigs of fresh thyme
450g potatoes, skin left on, washed and cut into large chunks
60ml soya milk
Method
Put the lentils into a pan and cover with plenty of cold water. Bring to the boil and then simmer for 15 minutes. Once cooked, drain the lentils reserving 2 tablespoons of cooking water.
Meanwhile, bring a pan of water to the boil and cook the potatoes till soft.
Separately, cook the onion in another pan with 10ml of olive oil over a low heat till they become soft and translucent.
Add the garlic and cook for 1 minute before adding the mushrooms in.
Add the stock powder and thyme leaves and allow to cook till the mushroom juices evaporate. Add the cooked lentils and reserved cooking liquid to the mushroom mixture.
Once the potatoes are cook, drain and allow to steam dry for 2 minutes. Heat the soya milk with the remaining olive oil in the pan used to cook the potatoes before adding them back in and mashing till smooth.
Preheat the oven to 180°C fan/ 200°C convection
Assemble the filling into an ovenproof dish and layer the mash over the top.
Bake for 25-30 minutes till the potato top turn crisp and golden brown.
Per serving: 513kcal/ 18.9g fat/ 2.9g saturated fat/ 66.6g carbohydrates/ 12.4g fibre/ 16.4g protein
Soup with a delicious autumnal twist making the most out of seasonal pumpkins which are being carved up for Halloween.
Sadly, over half the pumpkins carved at Halloween are under-utilised. The flesh and seeds of carving pumpkins are all edible, even once they have been carved. Pumpkins are a great source of beta-carotene, the precursor to vitamin A as suggested by the gorgeous golden-orange hue of the flesh and, in most cases, skins. A word of caution, if your pumpkin happens to have green skin your soup will adopt a “chip shop curry sauce” colour. Don’t worry, it will still be equally delicious!
If you don’t have any pumpkins hanging around you can substitute butternut squash or sweet potato as an alternative. These vegetables are still high in beta-carotene, an antioxidant that has previously been shown to help reduce the risk of heart disease and certain cancers.
Serves 4
Ingredients
2 large onions, roughly chopped
2 tbsp extra virgin olive oil
4 cloves of garlic, roughly chopped
3 tsp ground cumin
2 tsp ground turmeric
1 tsp dried chilli, or to taste
200g red lentils
500g pumpkin, skin on and roughly diced
200ml coconut milk
10g stock powder
15g fresh coriander, finely sliced
Method
Gently fry the onion and oil in a large pan till soft and translucent. Add the garlic and cook for a further 2 minutes.
Add the dried spices and cook till fragrant before adding in the remaining ingredients with 1 litre of boiling water.
Allow to simmer for 20 minutes till the lentils and pumpkin are cooked through and soft.
Blend till smooth and serve.
Per serving: 447kcal/ 18.6g fat/ 2.3g saturated fat/ 50.7g carbohydrates/ 7.6g fibre/ 16.4g protein
Autumn is upon us, so therefore so is soup season. I always enjoy a good bowl of hot soup on a crisp cold Autumn day, but sometimes I find myself wondering how to get the protein in for the meal. Using beans, pulses or lentils is a great way to include some protein in a soup meal.
In an effort to save time and reduce food waste I don’t peel the squash or carrots. Instead I scrub them before removing the tops and tail. The skin is easily blended into the soup and will contribute to some of the fibre content. What is not to love?
Any leftover soup can be stored in the fridge in an airtight container for up to 5 days. Alternatively, this soup freezes really well so you can make a large batch of this to pull out when you need a quick lunch.
Serves 4
Ingredients
2 tbsp extra virgin olive oil
400g butternut squash, cut into 1″ cubes
400g carrots, cut into 1″ pieces
1 large onion, cut into 1″ pieces
4 clove of garlic, skin on
1 tin of chickpeas, drained and rinsed
1 stock cube of choice
Method
Preheat the oven to 180°C fan/ 190°C convection.
Mix all of the ingredients, except the stock cube, in a large roasting tin. Roast in the oven for 1 hour, stirring half way through.
Boil 900ml of water and add the stock cube.
Remove the garlic cloves from their skins and add the roasted vegetables to the stock.
Blend the soup to the consistency of choice and serve.
Per serving: 276kcal/ 11.5g fat/ 1.7g saturated fat/ 32.7g carbohydrates/ 8.0g fibre/ 7.0g protein
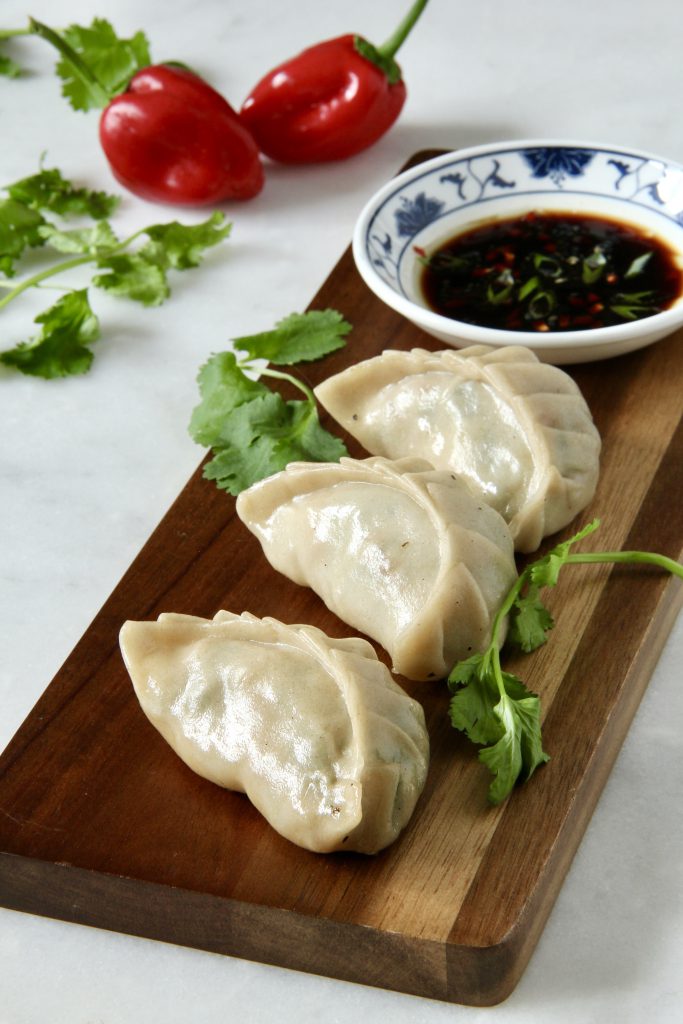
These easy to make dumplings look rather impressive. They also happen to be vegan, but if you wish you can add other flavours to the mix such as oyster sauce, fish sauce, or replace the tofu with an alternative source of protein.
If you want, you can also make a large batch of dumplings and freeze them. Simply line a baking tray with baking parchment and arrange the dumplings so they don’t touch. Freeze and then place into bags for up to 3 months. You can cook them straight from frozen, just add an extra few minutes onto the steaming time to make sure they are piping hot in the centre.
These little dumplings are delicious served with a simple dipping sauce made from soy sauce, sesame oil and rice wine vinegar. You can also add other flavours such as chilli, spring onion or sesame seeds. Alternatively, they are amazing dipped in some shop bought hoisin sauce!
2 dried shiitake mushrooms, soaked and finely diced. Reserve the soaking liquid
100g firm tofu
30g cabbage, finely sliced
30g carrot, finely diced
30g bamboo shoots, finely sliced
1 spring onion, finely chopped
10g coriander, finely chopped
1/2 tsp fresh ginger, very finely diced
1 tsp sesame oil
1 tsp Shaoxing wine
2 tsp light soy sauce
1 tsp cornflour
1/2 tsp rapeseed oil
Method
Mix all of the ingredients, except the rapeseed oil, and 2 tablespoons of the reserved shiitake mushroom liquid together. Gently heat in a pan or wok till the cabbage has softened and the liquid has become slightly thick so it coats all the ingredients, about 2-3 minutes. Add extra mushroom liquid if needed.
Allow the mixture to cool to room temperature.
Take 1 dumpling skin and fill it with a heaped teaspoon of the mixture. Pinch the end and then pleat the top half of the skin onto the bottom half of the skin to create a slight crescent shape.
Add the rapeseed oil to your frying pan to stop the dumplings from sticking, and arrange them so they have at least 1 cm between each dumpling. You may need to cook them in batches depending on the size of your pan.
Cook for 2-3 minutes over a low-medium heat so they are golden on the bottom. Then add hot water to cover the bottom third of the dumpling and immediately cover with a lid to steam the dumplings.
After 5 minutes, remove the lid and allow any remaining liquid to evaporate off, allowing the bottoms to crisp for 1 minute.
Remove the dumplings onto a plate and enjoy hot with a dipping sauce of your choice.
Per serving: 230kcal/ 5.8g fat/ 1.3g saturated fat/ 33.2g carbohydrates/ 3.6g fibre/ 9.7g protein
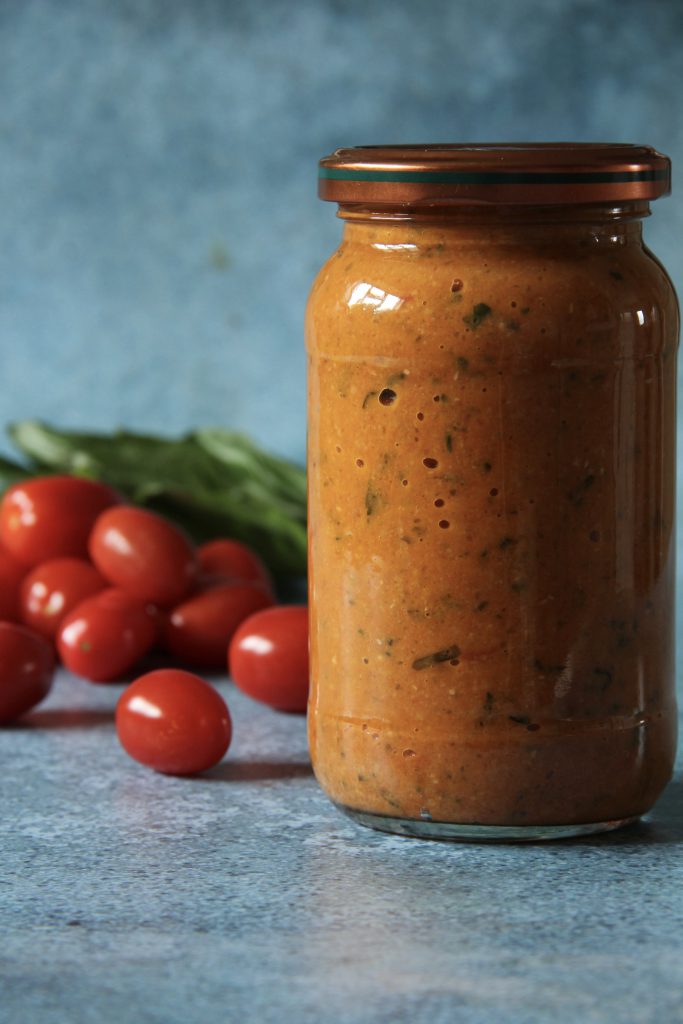
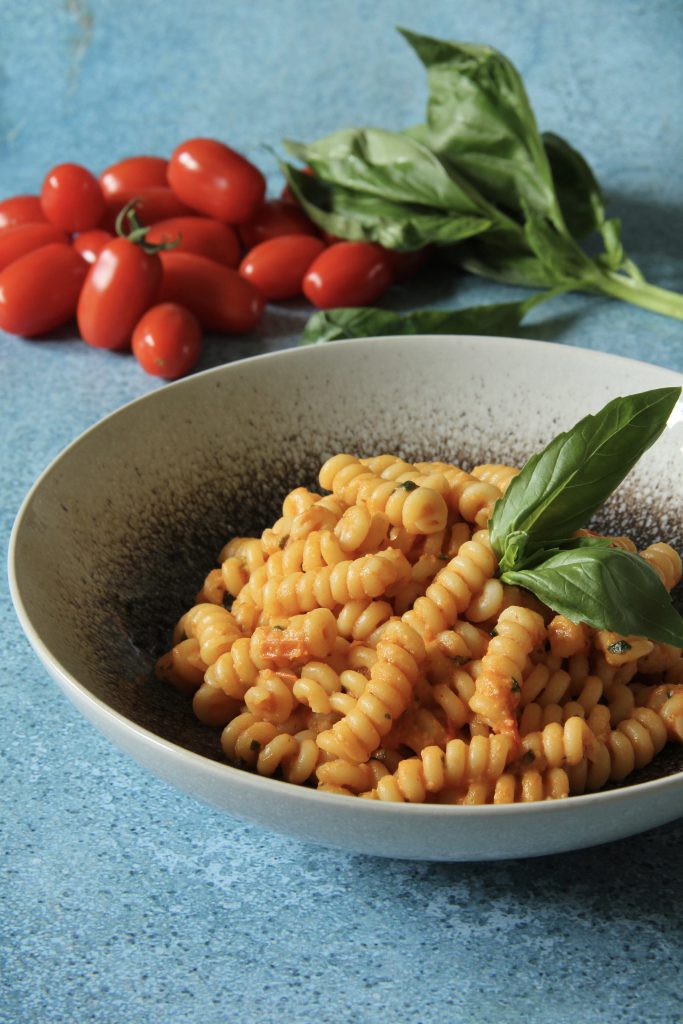
Using my homegrown sun-ripened tomatoes and pairing it with pine nuts makes for the most delicious and creamy sauce, yet is completely vegan! Perfectly paired with freshly cooked pasta, you could also use it over roasted vegetables, marinated cuts of meat, fish, or tofu, or spread it over freshly toasted bread to make a quick bruschetta.
Any left overs can be stored in the fridge in an airtight container for up to a week, or frozen for up to 3 months.
Makes 4 servings
Ingredients
2 large onions, finely diced
1 tbsp extra virgin olive oil
500g tomatoes, roughly diced
1 bunch of fresh basil, leaves and stalks
50g pine nuts
Method
Cook the onions and oil together over a low heat till the onions become translucent and soft.
Add the tomatoes and roughly chopped basil stalks, bringing to a light boil over a medium-low heat. Keep cooking till the volume has reduced by a third and the mixture becomes thicker, about 20 minutes.
Meanwhile, lightly toast your pine nuts under the grill for a few minutes, turning frequently to prevent them from burning. Keep them lightly golden to retain their natural sweetness.
Add the basil leaves and pine nuts to the tomato mixture and blend till smooth.
Per serving: 163kcal/ 13.0g fat/ 1.2g saturated fat/ 8.3g carbohydrates/ 2.4g fibre/ 3.4g protein
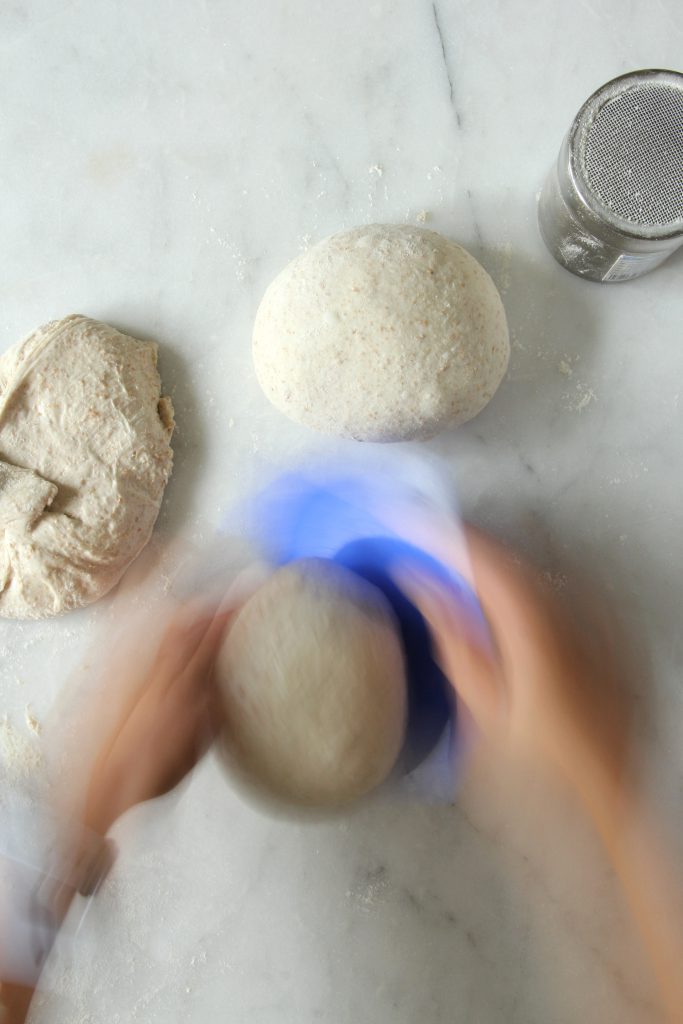
Easy to make sourdough pizza bases which are almost foolproof. You will need a minimum of 4 hours to make the bases, but in cooler temperatures it may take a little longer. Alternatively you can make the dough over a longer period of time in increase the flavour complexity of the base by allowing a longer fermentation. You can choose what you prefer, I tend to go for a medium fermentation of between 6-8 hours to get the texture and flavour I personally enjoy for my pizzas.
Makes 3 pizzas
Ingredients
Starter
15g starter, refreshed 10-12 hours prior to use
25g strong wholemeal flour
25g strong white flour
For the dough
100g strong wholemeal flour
400g strong white flour
8g salt
Method
The night before making pizzas, mix the starter, flours and 50ml filtered water together in a jar. Leave for 10-12 hours at room temperature.
The next day, mix the two flours in a large flat bottomed dish.
Measure 300ml tepid water (25°C) and add 100g starter refreshed the night before. Mix till homogenous and add to the flour, mixing well.
Leave covered with a tea towel for 30 minutes.
Measure 75ml tepid water and add the salt, mixing till dissolved.
Add to the autolysed mixture and mix till evenly distributed.
Cover and leave for 45 minutes.
Complete 1 coil fold, cover, and rest for 45 minutes
Repeat 3 more coil folds 45 minutes apart.
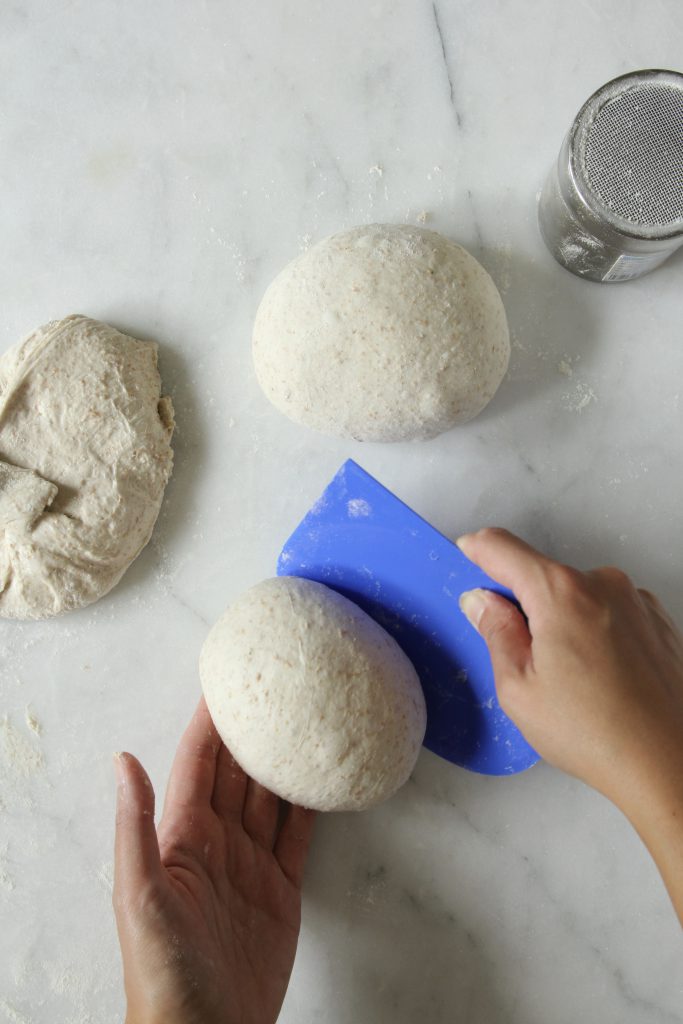
After resting for 45 minutes after the fourth coil fold, tip the dough out onto the work surface and dust liberally with a 50:50 mixture of rice flour and white flour.
Divide the dough into 3 equal portions and flip each portion so it is flour side down.
Working with one piece at a time, fold the corners into the centre, trying to incorporate as little flour as possible whilst creating tention in the skin. Use a dough scraper to help. Repeat with the remaining dough.
Place the dough balls on the dusted work surface and cover with a clean tea towel and leave to rest for 30 minutes.
An adaptation to the bao recipe my mum taught me for when you are shorter on time but still want something delicious!
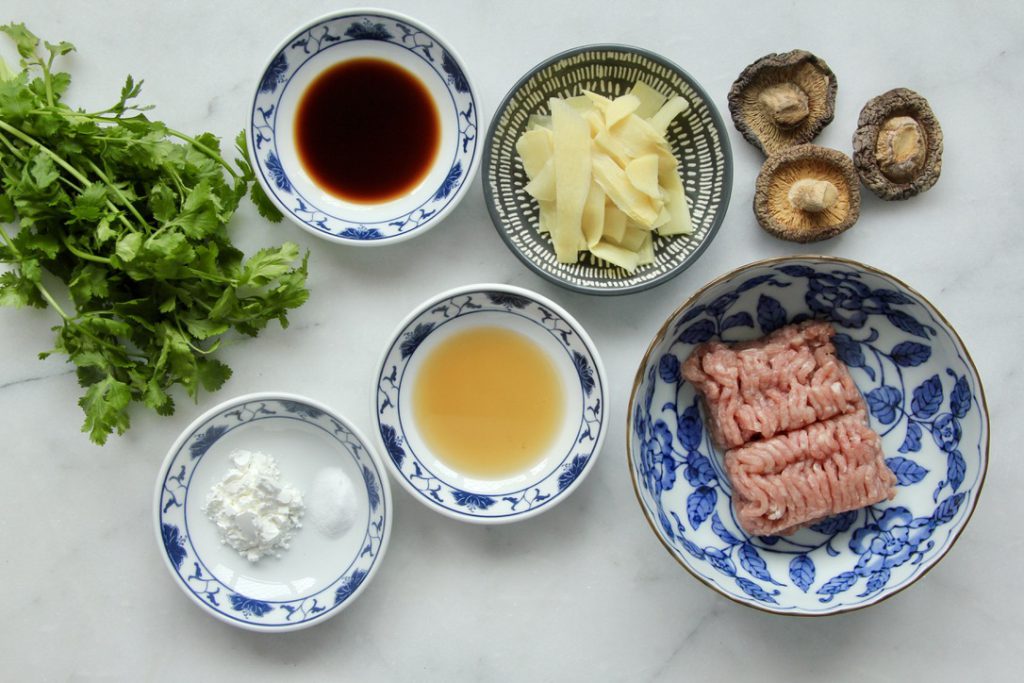
While Chinese recipes often call for pork, specifically fattier cuts such as belly of pork, I use minced turkey thigh in many of my dumpling recipes. Turkey is a leaner mince in comparison to standard pork mince (5.5g fat versus 11.6g fat per 100g respectively) yet still doesn’t dry out when cooked. This is partially due to the use of thigh meat rather than breast, which is usually much juicer, as well as the use of a tiny amount of bicarbonate of soda. The bicarbonate of soda, once mixed in with the mince, helps it stay soft and juicy, as well as give a little “bounce” which higher fat meats tend to have.
This is perfectly adaptable to whatever ingredients you wish to use. You can use firm tofu, which I also press to prevent excess water inside the dumpling. Swap weight for weight, although it can be a little more difficult to pleat the dumplings as the mixture is much more crumbly and does not stick together in the same way as meat does.
I also love to use fish and shellfish in dumplings. You could also do a mixture, one we often use in our family recipes is prawn and turkey, again traditionally it would have been pork and prawn, but we have added this little healthy swap which tastes absolutely delicious!
Folding the dumplings can be a little tricky. If you struggle the simplest shape you could make would be either a half-moon where you literally fold the skin on itself to make a semicircle shape, or you could gather all the pastry around to the top and squeeze to make a “money purse” shape. As you get more adventurous there are so many different shapes you can try.
3 shiitake mushrooms, fresh, or if dried soaked in water till soft, finely diced
35g bamboo shoots, finely sliced
15g coriander, roughly chopped
1/2 cm ginger slice, finely diced
Pinch of white pepper
Oil for cooking
Method
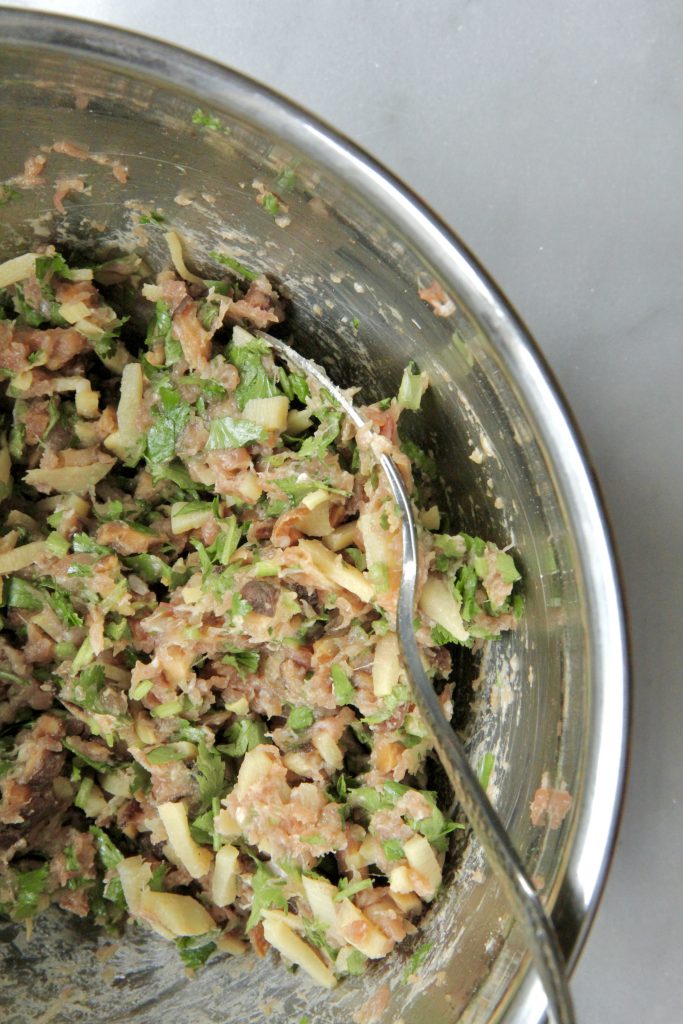
Mix the turkey mince with the bicarbonate of soda thoroughly. Then add all the remaining ingredients, except the oil for frying, and mix well.
Take 1 dumpling skin and fill it with a heaped teaspoon of the mixture. Pinch the end and then pleat the top half of the skin onto the bottom half of the skin to create a slight crescent shape.
Add a dash of oil to your frying pan to stop the dumplings from sticking, and arrange them so they have at least 1 cm between each dumpling. You may need to cook them in batches depending on the size of your pan.
Cook for 2-3 minutes over a low-medium heat so they are golden on the bottom. Then add hot water to cover the bottom third of the dumpling and immediately cover with a lid to steam the dumplings.
After 5 minutes, remove the lid and allow any remaining liquid to evaporate off, add a dash of sesame oil to finish and crisp the bottoms for 1 minute.
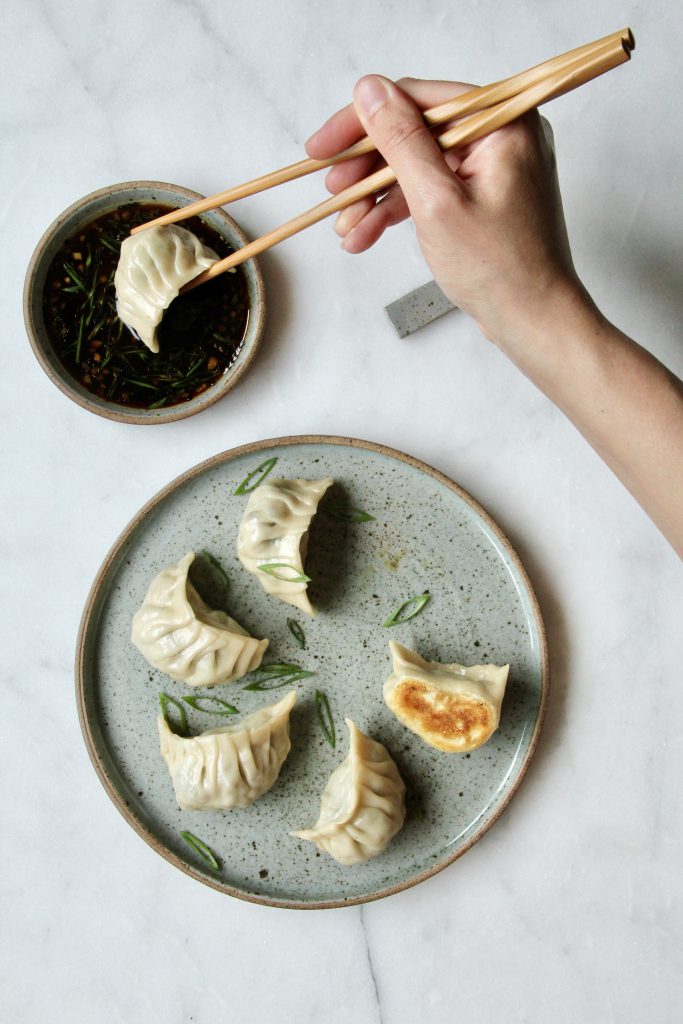
Remove the dumplings onto a plate and enjoy hot with a dipping sauce of your choice.
Per dumpling: 66kcal/ 1.9g fat/ 0.4g saturated fat/ 8.7g carbohydrates/ 0.7g fibre/ 3.3g protein
Start the day right with my wholemeal pancakes. These breakfast treats are delicious straight out of the pan and finished with your favourite toppings. You can go classic with berries and yoghurt as I have done below, or make a drizzle of tahini and honey, or even go more savoury with bacon and eggs.
Each portion of pancakes on their provides you with 6.4g fibre. That’s 21% of your daily fibre recommendation without having even added anything to them, so it really is a perfect way to start you day.
What if you don’t have wholemeal flour to hand? Not a problem, you can use plain flour, but this drastically reduces the fibre content down to just 1.8g per portion of pancakes, so if possible, add some high fibre ingredients back in such as ground linseeds, or try topping with my chia and blueberry compote.
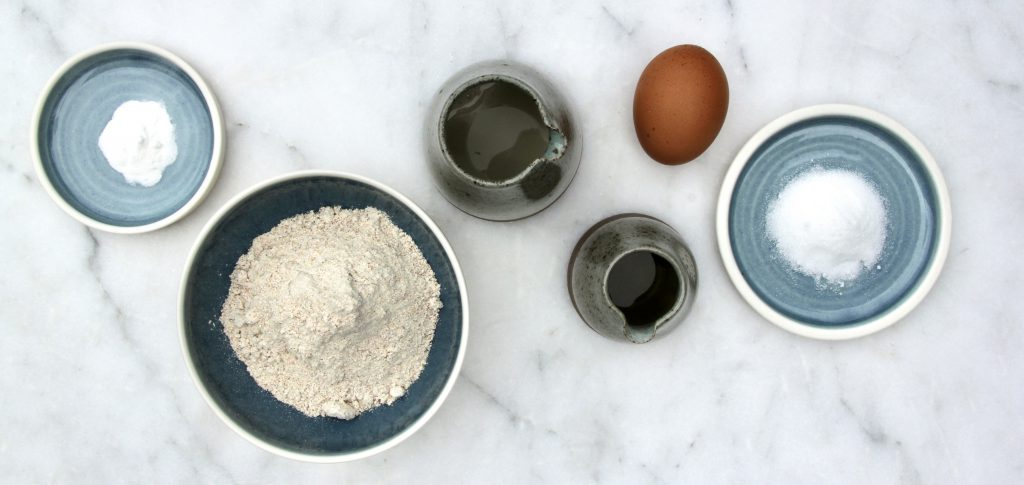
Serves 2
Ingredients
120g wholemeal flour
1 tsp baking powder
2 tsp caster sugar
1 medium egg
80ml milk of choice (I’ve used almond)
1 tbsp extra virgin olive oil + extra for cooking
Method
Mix the dry ingredients together
Mix the wet ingredients together, then combine with the dry ingredients.
Heat a pan over a medium heat with a drizzle of oil and drop a spoonful of batter into the pan. Add more batter depending on the size of you pan.
Turn the pancake over after 2 minutes, ensuring they are golden brown. Cook for a further 2 minutes on the second side.
Best served immediately from the pan with your favourite pancake topping.
Per 3 pancake serving: 384kcal/ 18.1g fat/ 2.9g saturated fat/ 46.0g carbohydrates/ 6.4g fibre/ 9.7g protein