This is my perfect working from home lunch when I have have 10 minutes to cook something. I want it to be nutritious but quick, and this is the perfect meal for that. You can sub the vegetables with what you have, but I always have frozen edamame beans in the freezer ready for a quick snack or meal. They’re a great source of plant-based protein, really affordable and conveniently shelled in the pack so you can just add them to whatever you’re cooking for the last minute or two.
Serves 2
Ingredients
1 garlic clove, minced
1/2″ piece of ginger, minced
3 tbsp tahini
1 tbsp mirin
1 tsp soy sauce
1 tsp sake
2 packs of udon noodles
160g choi sum
160g edamame beans
3 spring onions, finely sliced
2 sheets nori, cut into thin strips
1 tsp sesame seeds
Method
Cook the udon noodles according to the packet instructions, adding the veg in for the last minute of cooking.
Meanwhile make the sauce by combining the garlic, ginger, tahini, mirin, soy sauce and sake together.
Toss the cooked noodles in the sauce to evenly coat, adding some cooking water to get a smooth sauce consistency to your liking, and add the veg, garnishing with the spring onion, nori and sesame seeds.
10 minute sesame noodles
Per serving: 511kcal/ 23g fat/ 3g saturated fat/ 48g carbohydrates/ 11g fibre/ 21g protein
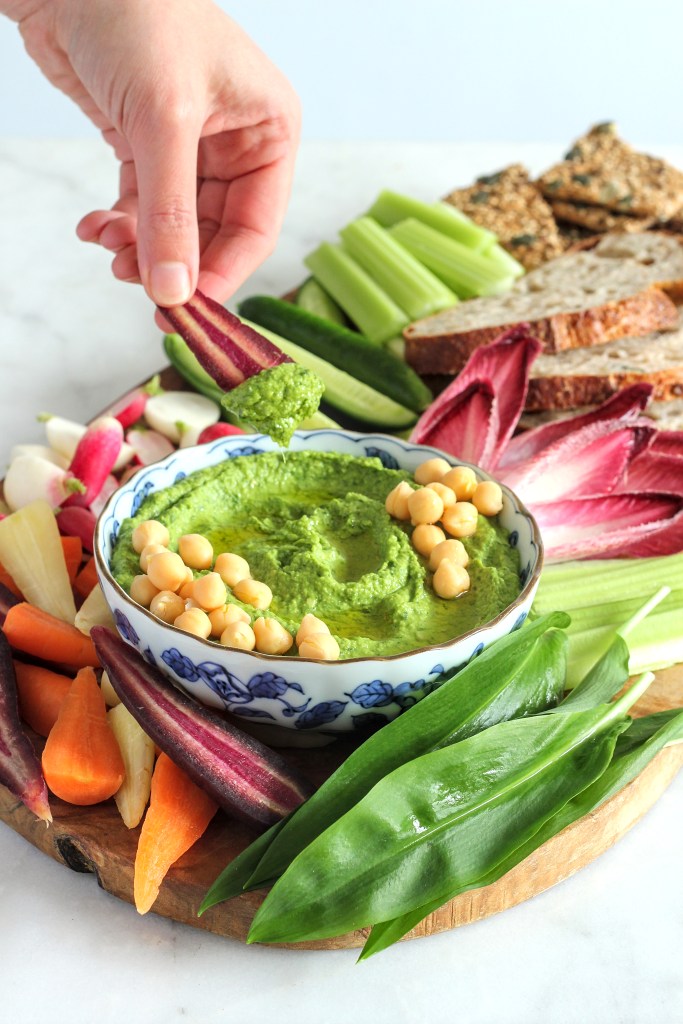
I’ve had a few requests for some wild garlic recipes which are easy, so I’ve made this Wild Garlic Hummus which couldn’t be simpler for anyone wanted to use wild garlic which has arrived in their weekly veg delivery box. You can choose how much wild garlic you want to use, and obviously the more you use, the greener it will be as well as the stronger the garlic taste – you can always add more!
Ingredients
50-100g wild garlic
1 tin of chickpeas
Juice of 1-2 lemons
50g tahini
2tbsp extra virgin olive oil
Method
Add everything to a blender and blend to a desireable consistency, adding extra lemon juice of olive oil where needed.
Serve with your favourite crudités, bread, crackers, storing any leftovers in an airtight container in the fridge for up to 7 days.
If the thought of making hot cross buns with chocolate and orange is too exotic for you, why not try my Best of Both Apple and Cinnamon Hot Cross Buns which are more traditional. But for anyone who isn’t put off by the thoughts of an unconventional hot cross bun, you’re in the right place!
My Best of Both Chocolate Orange Hot Cross Buns are the perfect combination of sweet, fruity and spiced goodness. They’re also best of both as they use wholemeal flour to help add extra fibre to the buns, meaning each serving provides you with over 5g of fibre, helping you achieve the daily recommendation of 30g.
Makes 9 buns
Ingredients
For the buns
175g strong wholemeal flour
150g strong white flour
25g cocoa powder
30g caster sugar
2 tsp ground cinnamon
1 tsp ground mixed spice
7g fast action yeast
50g butter, melted
Zest of 2 large oranges
Juice of 2 large oranges (175ml juice with a little of the pulp, made up with water if needed)
1 egg
60g sultanas
60g mixed peel
60g dark chocolate chips
For the crosses
10g butter
40g strong white flour
45ml water
For the glaze
50g marmalade
40ml water
Method
Add all the dried ingredients for the buns, except the dried fruit and chocolate, into a stand mixer. Add the butter, egg and orange zest and juice. Mix on a low speed for 10 minutes – the dough should be just sticky. After 10 minutes add the dried fruit and chocolate and mix for a further 2 minutes till incorporated. Form into a ball, cover, and allow to rise till doubled in size for around 1.5 hours.
Once the dough has doubled in size, knock it back and divide the ball into 9 equal pieces. Roll each piece into a tight ball without any fruit sticking out the top as these will burn. Place the balls in a 3×3 formation in a baking tin roughly 20cmx20cm lined with baking parchment. Cover and allow to prove for 30 minutes.
Preheat the oven to 200°C fan.
Melt the butter for the crosses and then whisk in the flour and water to make a thick pipe-able paste. Transfer into a piping bag and snip the end to make a small hole. Pipe crosses (or whatever you fancy) across the tops of the buns. Bake in the oven for 15 minutes till golden brown.
Meanwhile, in a saucepan, heat the water and marmalade to make the glaze.
Once the buns are cooker, immediately brush with the glaze.
Transfer to a wire rack, remove the baking parchment and allow to cool.
Per bun: 328kcal/ 9.6g fat/ 5.4g saturated fat/ 50.0g carbohydrates/ 5.4g fibre/ 7.9g protein
Salad means different things to different people. I refer to this as a salad, even though there is a distinct lack of green leafy vegetables as you might often think of. But trust me, this is worth adding to your repertoire!
It’s packed full of lovely ingredients that help provide a wide variety of nutrients including plenty of plant-based protein, fibre, vitamin A (in the form of beta-carotene), iron, folate and vitamin K1 to name but a few.
For those following a full plant-based diet try swapping the goat cheese for a plant-based cheese alternative, or use tofu and roast in the same way.
You also know that I love to use as much of my homegrown veg as possible. So, I’m making sure I save the seeds and roast them up as a crispy topping. It adds an extra texture dimension to the whole dish and saves edible food from going into the bin. The seeds also have slightly different nutritional properties to the flesh of the butternut squash itself, so it really is a win-win situation.
Serves 2
Ingredients
1 small butternut squash, around 400g when prepared, saving the seeds
2 cloves of garlic, skin on
2 tbsp extra virgin olive oil
100g goat cheese, sliced in half
100g puy lentils
1 tsp wholegrain mustard
1 tbsp balsamic vinegar
30g chives, finely chopped
50g flat-leaf parsley, finely chopped
Method
Preheat the oven to 180°C fan/ 200°C convection
Prep the butternut squash by removing the very ends and slicing in half lengthways. Remove the seeds, but save for later. Coat the butternut squash in 1 tbsp olive oil and place on a baking tray. In a separate small ovenproof dish add the garlic and 1/2 tbsp olive oil and cover. Bake for 25 minutes.
Meanwhile, separate the seeds from the pulp and dry before mixing with the remaining 1/2 tbsp olive oil. Remove the roasted garlic dish and spread the seeds out over the tray, and add the goat cheese into the cavity of the butternut squash. Bake for 12-15 minutes till the seeds are crispy and the cheese has melted.
Meanwhile, cook the lentils by bringing them to the boil and then simmer for 12-15 minutes till soft but still with a bite.
Remove the garlic skins and mash the garlic into the oil with the mustard and balsamic vinegar to make a sauce. Mix into the hot lentils, and once slightly cooled mix in the herbs.
Serve straight away hot, or equally delicious eaten cold as leftovers the next day.
Roasted Butternut Squash and Lentil Salad
Per serving: 565kcal/ 29g fat/ 11g saturated fat/ 40g carbohydrates/ 15g fibre/ 28g protein
If I was to ask you which is the best thing to eat to help with regular bowel movements, or to help relieve constipation, most of you would probably answer with prunes. They’re a classic home remedy for helping to keep you regular thanks to their high level of sorbitol. Sorbitol is a type of dietary fibre which is able to help draw water into the lumen of the gut, and therefore can help to soften hard stools, making them easier to pass.
So how do kiwi fruits come into this then? Well, kiwi fruit have more recently been hitting the headlines for their role in constipation which could be due to a specific enzyme called actinidin. Actinidin is a digestive enzyme that breaks down proteins, improves gastric emptying and may help facilitate laxation through its stimulation of receptors in the colon. Furthermore, kiwis have a high polyphenol content, which may also confer digestive health benefits. Polyphenols can promote the growth of beneficial gut bacteria, such as bifidobacteria. And finally, kiwis have a high water holding capacity and high viscosity, which helps with fecal bulking and softening.
Recent studies have demonstrated significant results in the treatment of constipation in healthy patients with IBS-C and in patients with functional constipation [1, 2]. Researchers used MRI techniques to identify the mechanism of action behind kiwi’s laxative effect and found that the consumption of two kiwi fruit daily increased water content in the small bowel and descending colon and increased colonic bulk. These MRI data are consistent with the observation that an increase in stool frequency with looser stool consistencies are seen with the consumption of two kiwi fruit daily and suggests that kiwis can be used as a natural, diet therapy for those with mild constipation [3].
Another study explored the comparative effectiveness of three natural treatments in patients with chronic constipation. This research is among the first data addressing the effectiveness and tolerability of kiwi fruit on chronic constipation in the United States. Seventy-five adults with either functional constipation or IBS type Constipation were provided around 6g of fibre per day in the form of two green kiwi fruit, 12 prunes (100g) or 12 grams of psyllium over a four-week treatment period. All participants experienced similar proportions of spontaneous bowel movements. However, the participants given kiwi fruit reported fewer adverse effects than those reported by patients treated with the prunes and psyllium. Notably, a smaller proportion of patients were dissatisfied with the kiwi fruit compared with the prunes or psyllium [4]. In addition, a randomised cross-over study looked at the effectiveness of 5g of dietary fiber from golden kiwifruit versus 5g of dietary fiber through a fibre supplement and saw similar improvements in stool consistency, straining and discomfort [5].
Kiwi Granola
I’ve paired my mini homegrown kiwis with no added sugar granola and some raspberries, which are another source of fibre, for the best gut-loving effect.
Bring a large pan of water to the boil and blanch the kale with the garlic for 1 minute before removing.
Blend the kale and garlic with the pine nuts, lemon juice, nutritional yeast, olive oil and a large pinch of salt till smooth – you will need a powerful blender to get a smooth sauce.
Meanwhile, cook the pasta according to the packet instructions, saving some pasta cooking water.
Once the pasta is cooked, drain and toss the kale pesto through, using a little pasta cooking water to loosen the sauce if needed.
Serve piled up high topped with the Burella
Vegan Kale Pesto Pasta
Per serving: 678kcal/ 33g fat/ 4.0g saturated fat/ 71g carbohydrates/ 9g fibre/ 19g protein
This recipe is for anyone who is clinging to these last few warm days of summer. It’s the end of my tomato growing season, my courgette plants are on the brink of shutting down, and the nights are slowly drawing in. So here’s a comforting summer-style galette making the most of those wonderful tomatoes. Other veg that would work well in place of tomatoes here include courgettes, Swiss chard, aubergine, peppers, kale, leeks or even onions – most of these would need cooking either partially, or fully, before placing on top.
Serves 6 as a starter or 4 as a main
Ingredients
65g cold unsalted butter, cut into cubes
160g wholemeal plain flour
3 tsp fresh thyme leaves
100g soft goats cheese
100g cream cheese
2 tsp fresh oregano leaves
1/4 tsp white pepper
325g sliced tomatoes
1 egg, beaten
40g hard goats cheese
Method
Make the pastry by combining the butter, flour and 1 tsp thyme leaves together till it resembles breadcrumbs with your fingertips. Then add 35-40ml ice cold water and bring together to form a dough. Cover and refrigerate for 30 minutes.
Meanwhile, mix the soft goat cheese, cream cheese, 1 tsp thyme, 1 tsp oregano and pepper together till smooth.
Preheat the oven to 180°C fan/ 200°C convection
Roll the dough out to make a large disk approximately 25cm diameter and transfer it onto a lined baking sheet. Spread the cheese mixture over the base, leaving a 1-inch border around the edge. Layer on the cut tomatoes.
Gently fold the edges over onto the filling. Brush the exposed pastry crust with the beaten egg and dust the whole galette with the remaining herbs and hard goats cheese, paying particular attention to the pastry edge.
Bake in the oven to 20 minutes till the pastry turns a deeper golden colour and the tomatoes have softened.
Delicious served warm or cold for a packed lunch.
I love serving my galette with a side salad with yet more tomatoes
Per sixth: 310kcal/ 20g fat/ 13g saturated fat/ 19g carbohydrates/ 3.4g fibre/ 9.9g protein
When you’re short on time but still want something freshly cooked without the hassle or the mess left after? Here’s my easy One Pan Boursin Pasta Bake which takes 5 minutes of prep and only makes 1 pan dirty!
I’m using seasonal courgettes and tomatoes to provide 2 of your 5-a-day in this dish, but if you don’t have these, or they’re not in season you can use other vegetables such as leeks, peppers, broccoli, cauliflower or even a tin of chopped tomatoes.
This dish is also naturally lower in salt, providing just 0.64g per adult-sized serving, making it family-friendly once you adjust the portion size.
Serves 3 hungry adults, or a family of 4
Ingredients
300g dried pasta with a cooking time of about 10 minutes
In a large ovenproof dish, add the pasta and place the Boursin in the middle on top of the pasta. Cover the remaining exposed pasta with the grated courgettes and sliced tomatoes.
Add the boiling water and bake in the oven for 45 minutes.
Remove from the oven and mix everything together, add in the basil and season with pepper to taste.
Delicious served hot
One Pan Boursin Pasta Bake
Per adult serving: 600kcal/ 22g fat/ 13g saturated fat/ 75g carbohydrates/ 8.2g fibre/ 19g protein/ 0.64g salt
Here’s my super easy Summer Quinoa Salad recipe which incorporates all of these concepts in one dish.
Serves 4 as a main
Ingredients
200g quinoa
30ml extra virgin olive oil
15g chives, chopped
15g flat-leaf parsley, chopped
200g cucumber, cubed
250g cherry tomatoes, chopped
1 tin of chickpeas, drained and rinsed
Juice of 2 lemons
1 large avocado (use some of the lemon juice to prevent it from browning)
80g black olives, roughly chopped
20g pumpkin seeds
20g sunflower seeds
Method
Add the quinoa to a pan with 400ml of cold water. Bring to a boil and allow to simmer for 12-15 minutes, or until all the water is absorbed. Remove from the heat and cover with a lid for 5 minutes before fluffing with a fork. Allow to cool.
Add the cooked quinoa to a large bowl along with all of the remaining ingredients and mix together.
Serve, remembering to put any spare salad away in a Tupperware in the fridge for the next day.
Per serving: 530kcal/ 29g fat/ 4.4g saturated fat/ 44g carbohydrates/ 11g fibre/16g protein
With Easter approaching, here is an easy way to add a little extra goodness to chocolate with a fun twist. Perfect for entertaining the kids over the holidays whilst getting a little added fibre into the diet.
Makes 12
Ingredients
200g dark chocolate
2 tbsp extra virgin olive oil
80g dried fruits (I’ve used dried cherries)
225g bran cereal sticks
12 mini eggs
Method
Melt the dark chocolate over a bain-marie. Add the olive oil, dried fruits and bran cereal and mix till evenly distributed.
Divide the mixture into 12 equal portions in cupcake cases. Add a mini egg on the top of each nest.
Allow to set completely (option to chill in the fridge for 30 minutes if you can’t wait) before enjoying.
Per nest: 203kcal/ 11g fat/ 4.5g saturated fat/ 21g carbohydrates/ 3.8g fibre/ 3.1g protein
What do Jerusalem artichokes, garlic, onions and leeks all have in common? They’re all prebiotics, which means they help feed the good bacteria in your gut.
If you’re not used to eating lots of prebiotics in your diet, you may well feel a little gassy after, but that’s your gut microbiota enjoying these special fibres. When they enjoy them, they ferment them, producing extra gas which you may notice either as bloating or flatulence. All good things, but always good to know in advance of this happening.
Serves 10
Ingredients
2 tbsp extra virgin olive oil
2 large onions, sliced
2 leeks, sliced
4 sticks of celery, sliced
5 garlic cloves
400g celeriac, roughly chopped
800g Jerusalem artichokes, roughly chopped
250ml white wine
1 stock cube dissolved in 1.2l hot water
1 bunch of thyme
150ml double cream
To serve
Extra chopped herbs e.g. thyme leaves, chives, flat leaf parsley
Sourdough bread
Method
In a large pan, add the oil, onion, leeks and celery and cook for 5 mintues till soft.
Add the garlic, celeriac and Jerusalem artichokes followed by the wine, stock and thyme. Cook till the vegetables are soft.
Remove the woody herb stems before blending with the double cream. Season to taste with pepper.
Serve sprinkled with extra herbs and pepper and a slice of sourdough bread
Prebiotic Winter Soup
Per serving of soup: 204kcal/ 11g fat/ 5.6g saturated fat/ 15g carbohydrates/ 5.1g fibre/ 3.4g protein
We often think of fluffy buttermilk pancakes, but sometimes I struggle to find buttermilk in the shops. However, these ricotta pancakes are just as fluffy and oh-so delicious!
At this time of year, oranges are in season, including these gorgeous blood oranges with their vibrant red flesh. They’re extra sweet too, so for me they work perfectly as a little drizzle over the top of the pancakes just before serving, helping to enhance the lovely orange flavour of the pancakes.
I love these served with Greek yoghurt and extra orange segments, but if you have an extra sweet tooth you could serve them with some maple syrup.
I’ve used wholemeal flour in this recipe, which adds an extra 3g of fibre per serving in comparison to plain white flour. That’s an easy add of 10% of your daily recommendation of fibre with minimal effort! Plus you won’t be able to tell the difference with the end product.
Serves 5
Ingredients
250g plain wholemeal flour
50g caster sugar
1 tsp baking powder
1/2 tsp bicarbonate of Soda
1/4 tsp salt
4 eggs
250g ricotta
250ml milk
1 orange, zest and juice
120g 70% dark chocolate
To serve
5 tablespoons of greek yoghurt
2-3 oranges, segmented, and the remaining juice squeezed out
Method
In a large bowl mix the flour, sugar, baking powder, bicarb and salt together.
In a separate bowl, whisk the eggs, ricotta and milk together. Add the orange zest and 50ml orange juice.
Pour the wet ingredients into the dry ingredients and mix together before adding the chocolate – don’t over mix the batter, keep some lumps of flour to ensure you get really lovely and fluffy pancakes.
Heat a pan over a low heat and brush with a little oil. Place 1 ladle spoon of batter into the centre of the pan and allow it to cook for 3 minutes (the pancake will spread out slightly so if cooking more than one in a pan at a time ensure there is sufficient gaps between them), watching for little bubbles to appear on the surface and the edges to start to darken before flipping and cooking for 2 minutes on the second side.
Repeat with the remaining batter, keeping the cooked pancakes covered and warm (option to keep the oven on at 50°C). You should make around 10 pancakes with the batter.
Serve warm with a spoonful of yoghurt, some orange segments and a drizzle of orange juice.
Chocolate Orange Ricotta Pancakes
Per serving: 763kcal/ 37g fat/ 20g saturated fat/ 67g carbohydrates/ 9.4g fibre/ 35g protein