Using my principles of sustainable nutrition, here is a delicious recipe incorporating using more of the food we grow and reducing food waste, eating more plant-based proteins, cooking in bulk, and diversifying the foods we grow and eat. Added all together each serving of my Roasted Harissa Cauliflower and Chickpea Traybake with Herbed Spelt provides you with a whopping 19g fibre and 22g plant-based protein.
Serves 6
Ingredients
1 large cauliflower head, leaves and all (1.1kg), cut up into chunks, and larger leaves sliced in half through the stem
3 carrots, cut into chunks
2 red onions, cut into wedges
80g harissa paste
2 tsp cumin seeds
3 tbsp extra virgin olive oil
2 tins of chickpeas, drained, rinsed and patted dry
300g spelt
50g flat-leaf parsley, roughly chopped
30g chives, finely sliced
2 tbsp tahini
Juice of half a lemon
4 tbsp of pomegranate seeds
Method
Preheat the oven to 180°C fan/ 200°C convection while you prep the cauliflower, carrots and onions. Mix these veg together with the harissa paste and 2 tbsp olive oil. Spread out over 2 trays and roast for 20 minutes.
Mix the remaining oil and chickpeas together, and add to the trays, mixing the partially cooked veg.
Meanwhile, cook the spelt by bringing it to a boil in a large pan of water, and then allow to simmer for 20-30 minutes depending on the type of spelt you have. It should remain al dente in the middle. Once cooked, allow to cool slightly before adding the herbs in.
Make a dressing by mixing the tahini and lemon juice together. It will become thick, so thin with water to a consistency of double cream, or your preference.
Serve everything together, topped with the tahini dressing and sprinkle with pomegranate seeds over the top.
Harissa Roasted Cauliflower and Chickpea Bake
Per serving: 487kcal/ 10g fat/ 1.4g saturated fat/ 68g carbohydrates/ 19g fibre/ 22g protein
If I was to ask you which is the best thing to eat to help with regular bowel movements, or to help relieve constipation, most of you would probably answer with prunes. They’re a classic home remedy for helping to keep you regular thanks to their high level of sorbitol. Sorbitol is a type of dietary fibre which is able to help draw water into the lumen of the gut, and therefore can help to soften hard stools, making them easier to pass.
So how do kiwi fruits come into this then? Well, kiwi fruit have more recently been hitting the headlines for their role in constipation which could be due to a specific enzyme called actinidin. Actinidin is a digestive enzyme that breaks down proteins, improves gastric emptying and may help facilitate laxation through its stimulation of receptors in the colon. Furthermore, kiwis have a high polyphenol content, which may also confer digestive health benefits. Polyphenols can promote the growth of beneficial gut bacteria, such as bifidobacteria. And finally, kiwis have a high water holding capacity and high viscosity, which helps with fecal bulking and softening.
Recent studies have demonstrated significant results in the treatment of constipation in healthy patients with IBS-C and in patients with functional constipation [1, 2]. Researchers used MRI techniques to identify the mechanism of action behind kiwi’s laxative effect and found that the consumption of two kiwi fruit daily increased water content in the small bowel and descending colon and increased colonic bulk. These MRI data are consistent with the observation that an increase in stool frequency with looser stool consistencies are seen with the consumption of two kiwi fruit daily and suggests that kiwis can be used as a natural, diet therapy for those with mild constipation [3].
Another study explored the comparative effectiveness of three natural treatments in patients with chronic constipation. This research is among the first data addressing the effectiveness and tolerability of kiwi fruit on chronic constipation in the United States. Seventy-five adults with either functional constipation or IBS type Constipation were provided around 6g of fibre per day in the form of two green kiwi fruit, 12 prunes (100g) or 12 grams of psyllium over a four-week treatment period. All participants experienced similar proportions of spontaneous bowel movements. However, the participants given kiwi fruit reported fewer adverse effects than those reported by patients treated with the prunes and psyllium. Notably, a smaller proportion of patients were dissatisfied with the kiwi fruit compared with the prunes or psyllium [4]. In addition, a randomised cross-over study looked at the effectiveness of 5g of dietary fiber from golden kiwifruit versus 5g of dietary fiber through a fibre supplement and saw similar improvements in stool consistency, straining and discomfort [5].
Kiwi Granola
I’ve paired my mini homegrown kiwis with no added sugar granola and some raspberries, which are another source of fibre, for the best gut-loving effect.
Rather than growing a carving pumpkin, I prefer to grow squash as they’re a bit more tasty than standard carving pumpkins. I’m also all about the guts, so in this recipe I’m using the whole of the edible pumpkins, with just the inedible stalk and pumpkin bum, aka the blossom end, left for the compost bin. I keep the skin of the butternut squash on the flesh – this helps save time, and prevent unnecessary food waste, but also a lot of people injure themselves when peeling squash so let’s keep the gore to fake blood.
This is also perfect to make if you are cooking something else in the oven already. You can roast the vegetables in advance, and then when you are ready turn them into the soup at a later time – just allow everything to come back to the boil for a few minutes before blending.
If you don’t have a squash to hand but still want to make this soup you can opt for pre-prepared butternut squash from the freezer which can be more convenient for some people. If this is the case try using green pumpkin seeds you can buy in the shops.
Squash and pumpkins are excellent sources of beta-carotene, which our body converts into vitamin A. We need this vitamin to help maintain healthy skin, a healthy immune system, and also help our eyes to see in the dark! Or at least that’s what the kid’s like to hear most often!
I love serving my soup with some tomato cheese on sourdough toast! It’s such a treat, and helps make this soup a balanced meal.
Makes 6 generous servings
Ingredients
1 large butternut squash, cut into large chunks – mine was 1.3kg once I had prepared it
3 onions, quartered
1 head of garlic, the very top removed
2.5 tbsp extra virgin olive oil
150g red lentils
1 stock cube, I used a vegetable one
Herbs for garnishing e.g. flat-leaf parsley or chives
Method
Preheat the oven to 180°C fan/ GM6
To a large baking tray, add the cubed butternut squash, quartered onions, garlic bulb, and 2 tbsp extra virgin olive oil. Mix to evenly coat everything with oil, and place the garlic in the middle of the tray to prevent it from burning. Roast in the oven for 45 minutes till the veg start to turn golden brown.
Meanwhile, prepare the squash seeds by placing the squash “guts” into a bowl and adding some water. Loosen the seeds from the stringy flesh before placing on a clean teatowel to thoroughly dry. Place the seeds into a small baking tray, adding the remaining half tbsp extra virgin olive oil and mixing to evenly coat. Place the tray at the bottom of the oven and roast for 10-15 minutes till deep golden in colour and crispy.
While the veg is roasting, bring around 600ml water to the boil and add the lentils and stock cube. Cook the lentils for around 10 minutes till soft.
Once the veg is cooked, add it to the pan with the now cooked lentils, and squeeze the garlic out of the paper. Deglaze the pan with boiling water, and then top up the water in the pan so it covers the vegetables. In total, you will need to add around 1.8l of water. Bring everything back to a boil and cook for 5 minutes before blending into a soup of your desired consistency, adding more water to thin the soup if desired, and seasoning with pepper to taste.
Serve the soup piping hot, dressed with a little extra olive oil if desired, and scattered with fresh herbs and crispy seeds.
Roasted Butternut Squash and Red Lentil Soup
Per serving*: 285kcal/ 8.1g fat/ 1.2g saturated fat/ 37g carbohydrates/ 11g fibre/ 11g protein
*nutritional analysis using pumpkin seeds, which are different to the seeds found in a squash
Bring a large pan of water to the boil and blanch the kale with the garlic for 1 minute before removing.
Blend the kale and garlic with the pine nuts, lemon juice, nutritional yeast, olive oil and a large pinch of salt till smooth – you will need a powerful blender to get a smooth sauce.
Meanwhile, cook the pasta according to the packet instructions, saving some pasta cooking water.
Once the pasta is cooked, drain and toss the kale pesto through, using a little pasta cooking water to loosen the sauce if needed.
Serve piled up high topped with the Burella
Vegan Kale Pesto Pasta
Per serving: 678kcal/ 33g fat/ 4.0g saturated fat/ 71g carbohydrates/ 9g fibre/ 19g protein
Here’s my super easy Summer Quinoa Salad recipe which incorporates all of these concepts in one dish.
Serves 4 as a main
Ingredients
200g quinoa
30ml extra virgin olive oil
15g chives, chopped
15g flat-leaf parsley, chopped
200g cucumber, cubed
250g cherry tomatoes, chopped
1 tin of chickpeas, drained and rinsed
Juice of 2 lemons
1 large avocado (use some of the lemon juice to prevent it from browning)
80g black olives, roughly chopped
20g pumpkin seeds
20g sunflower seeds
Method
Add the quinoa to a pan with 400ml of cold water. Bring to a boil and allow to simmer for 12-15 minutes, or until all the water is absorbed. Remove from the heat and cover with a lid for 5 minutes before fluffing with a fork. Allow to cool.
Add the cooked quinoa to a large bowl along with all of the remaining ingredients and mix together.
Serve, remembering to put any spare salad away in a Tupperware in the fridge for the next day.
Per serving: 530kcal/ 29g fat/ 4.4g saturated fat/ 44g carbohydrates/ 11g fibre/16g protein
This Sundried Tomato and Red Pepper Pasta Bake is so simple and yet so tasty. You could make the pasta sauce and stir it through hot pasta and sprinkle the cheese on to eat it as it is to make it every quicker, but I do like the extra texture you get from baking it in the oven.
There are many sources of vitamin B12, but plant-based sources are limited to fortified foods including some breakfast cereals, dairy alternatives, nutritional year and yeast spreads and some specially grown mushrooms.
With vitamin B12, the more frequently you have it, the less you body needs as it is more efficient at absorbing it. Therefore, if you have B12 less often, your requirements go up to 10μg/day (if only have one intake of B12), or 2000μg per week. Each serving of my pasta provides you with 3μg, which is the daily recommendation if you are having multiple sources of B12 per day. Therefore, this can help you achieve the daily requirement if paired with other vitamin B12 containing foods throughout the day.
Serves 4
Ingredients
100g sundried tomatoes
200g cooked red peppers in brine
60g almonds
30g basil, stems removed from leaves
1 tbsp balsamic vinegar
1 tbsp oil from the sundried tomatoes (or use extra virgin olive oil if you prefer)
150ml soya milk fortified with vitamin B12
20g nutritional yeast fortified with vitamin B12
300g pasta
300g broccoli
100g vegan cheese fortified with vitamin B12
2 tbsp breadcrumbs
Method
Bring a pan of water to the boil and cook your pasta according to the cooking instructions, adding the broccoli in for the last 4 minutes.
Preheat the oven to 180°C fan/ 200°C convection
Blend the tomatoes, peppers, almonds, basil stems, balsamic vinegar, oil, soya milk and nutritional yeast together to make a sauce.
Mix the sauce through the cooked pasta and broccoli, adding the basil leaves, and use a little pasta cooking water to get every scrap of sauce from the blender before pouring into a baking dish.
Mix the breadcrumbs and vegan cheese together and sprinkle over the top of the pasta bake. Cook for 20 minutes till golden brown and crispy.
This was a childhood recipe I would make it every weekend. I loved this recipe so much, but the original recipe used cow’s milk. I’ve turned it vegan by using some unsweetened soya milk and rapeseed oil in place of the butter. I still get that nostalgic feeling when eating this vegan version.
I’m using mushrooms which naturally contain vitamin D. I’ve written about this before where I talked about exposing shop-bought mushrooms to sunlight to make your own vitamin D mushrooms at home. You can buy mushrooms which have already been exposed to UVB rays, and therefore already contain vitamin D2. This can be useful if it’s not a sunny day or you don’t have time to let your mushrooms make vitamin D.
Serves 1
Ingredients
10g rapeseed oil
100g vitamin D mushrooms
1 tbsp plain flour
1 tbsp mushroom ketchup
150ml unsweetened fortified soya milk
1 slice of toast
Method
In a saucepan, heat the oil and fry the mushrooms till they release all their juices and they evapourate off.
Add the flour and mix into the mushrooms before adding the mushroom ketchup. Add the soya milk in a little bit at a time, stirring continuously to get a smooth sauce.
Once all the milk has been added, cook for a couple of minutes before serving piled high on a slice of toast
Iron can be found in animal sources e.g. meat and fish (known as haem iron) or from plant sources e.g. beans, pulses, nuts and fortified product such as cereals and bread (known as non-haem).
Serves 6
Ingredient
1 chipotle chilli
1 tbsp extra virgin olive oil
2 red onions, chopped
2 sticks of celery, diced
3 garlic cloves, chopped
1 tsp dried oregano
2 tsp smoked paprika
1/2 tsp white pepper
1/2 tsp salt
1 tin black beans, rinsed and drained
1 tin haricot beans, rinsed and drained
2 bell peppers, sliced
1 tin of chopped tomatoes
2 tbsp tomato puree
30g coriander, chopped, leaves reserved
200g kale, finely sliced
To serve
6 portions of cooked brown basmati rice
1 avocado, sliced
6 tbsp soya yoghurt
30g dairy-alternative cheese
1 lime, cut into 6 wedges
Method
Soak the chipotle chilli in 100ml boiling water for 5 minutes.
Meanwhile, add the olive oil, onions and celery to a large pan and cook for 5 minutes till soft. Chop the now soaked chipotle chilli and add to the pan along with the garlic and cook for a few minutes.
Add the dried spices, beans and peppers and cook for 1 minute before adding in the tinned tomatoes, tomato puree, chipotle soaking water and around 200ml extra water. Add the coriander stems and cook for 20 minutes.
In the final 5 minutes of cooking, add the kale.
Serve in bowls with rice, and add the optional extras of avocado, soya yoghurt, dairy-free cheese and a squeeze of lime.
Per serving: 473kcal/ 13g fat/ 2.1g saturated fat/ 64g carbohydrates/ 15g fibre/ 16g protein/ 4.1mg iron
Looking to increase your intake of omega-3 fatty acids when you don’t eat fish? Here’s an easy fix you can use to help increase your dietary omega-3 intake.
Makes 20 servings
Ingredients
100g pitted dates
30g chia seeds
30g linseeds
150g rolled oats
50g rye flakes
50g barley flakes
50g spelt flakes
100g chopped walnuts*
30g sunflower seeds
50g desiccated coconut
50ml extra virgin olive oil
100g sultanas
100g dried cherries
Method
Preheat the oven to 120°C fan/ 130°C convection
Soak the dates in 200ml boiling water for 5 minutes, before adding the chia and linseeds and blending to a paste.
In a large mixing bowl add the oats, rye, barley, spelt, walnuts, sunflower seeds and coconut. Add the date paste and mix thoroughly before adding the olive oil and mixing again.
Spread the mixture out evenly on a baking tray. Bake for 30 minutes before turning the mixture, keeping large chunks. Bake again for 20 minutes, before flipping over again one last time, breaking up any very large chunks before baking for a final 20 minutes.
Allow the granola to completely cool before mixing in the dried fruit and storing in an airtight container.
For those who are trying Veganuary for the first time, or for those who have been vegan for a while now, there are specific nutrients that can be lacking in a vegan diet if not carefully planned. Here I outline a few of the key nutrients commonly found to be lower in those consuming a fully plant-based diet.
Firm tofu can be a source of calcium
Calcium
For the majority of people, calcium comes from milk and dairy products. If you are following a purely plant-based diet, make sure you dairy alternatives are fortified with calcium. Other sources of calcium include dark green leafy vegetables, nuts such as almonds and firm tofu which has been set with either calcium sulphate or calcium phosphate. Silken tofu, which is soft and unset, contains much less calcium per serving, and those set with non-calcium products (e.g. seaweed or magnesium sulphate).
Recommended intakes of calcium are 700mg/d for women and 800mg/d for men aged 18-65 years.
Why not try some of my high calcium recipes which use calcium set tofu, or fortified dailry alternatives:
The richest iodine containing foods are white fish, in particular cod and haddock, as well as scampi, however, the best source of dietary iodine comes from milk and dairy products due to farming practices. Replacing milk with a dairy alternative which has been fortified with iodine is a good option, but not all alternative milks are fortified, so it’s best to check the label. Other dietary sources of iodine include seaweed, but the concentration of iodine varies, with some varieties of seaweed containing very high concentrations and therefore it is not recommended for pregnant women.
Iodine recommendations are 150mg/d for adults, and 200mg/d for pregnant and breastfeeding women.
Here are some recipes you can use iodine fortified dairy alternatives with:
There are two main sources of dietary iron; haemiron and non-haem iron. Haem-iron is found in animal products such as meat, in particular red meat and offal, poultry and fish. This form of iron has a higher bioavailability (the ability for your body to absorb it) with particular ference to the red meat and offal. Non-haem iron is found in plnat-based foods and tends to be less bioavailable, despite being more abundant in our diets. Non-haem iron food sources include grains, pulses, beans, nuts, fruits and vegetable.
Beans can be a good source of dietary iron
Non-haem sources of iron can actually benefit from being consumed with a food containing vitamin C. This is because vitamin C increases the absorption of non-haem iron, so including some fruits such as citrus fruits and berries, or green leafy vegetables may increase iron uptake in a purely plant-based diet.
Vitamin B12 is a water soluble vitamin which plays an important role in energy production and together with folate and vitamin B6 is required for the maintenance of normal blood homocysteine levels, as well as ensuring your brain and nerve cells function properly. B12 food sources are predominantly animal derrived, with meat, fish, cheese and eggs being main contributors. Plant-based sources include fortified cereals, fortified dairy alternatives and yeast extracts such as Marmite. Additionally, some mushrooms contain B12 and will proudly state this on their packaging.
This nutrient is synonymous with oil fish such as salmon and mackerel. However, on a vegan diet these foods are excluded from the diet. We therefore need to find alternative plant-based sources of omega-3’s in the diet such as chia, linseeds and walnuts as these fats are known to be beneficial for brain development at all ages, as well as being good for overall heart health.
Try replacing some of the ingreidnets in these recipes to further boost the omega-3 content:
Zinc is an essential trace mineral most commonly associated with immunity, assisting wound healing and in the production of proteins in the body. Dietary sources of zinc are similar to those of iron, including beans, wholegrains, nuts and seeds. With zinc, fermentation of good plant-based sources of zinc can help increase zinc absorption. This includes foods such as fermented soy beans including tempeh, natto and miso, unfermented beans (soak them before cooking to improve zinc absorption), and certain fortified breakfast cereals.
Try some of my recipes which naturally contain zinc:
As you know, this is one of my favourite topics to talk about, and is something we all need to be aware of as dietary sources of vitamin D are rare even for those who aren’t vegan. Vegan sources of vitamin D include fortified foods such as milk alternatives, as well as functional foods such as UVB exposed mushrooms. It is important to consider a supplement for this nutrient as the food sources are quite limited and often do not meet the UK daily recommendation of 10 mcg per day.
I have a few recipes which will provide some of your vitamin D requirements:
For further information I have written a blog for MyNutriWeb on this topic which you may find useful if you are completing Veganuary or follow a vegan or very high plant-based diet.
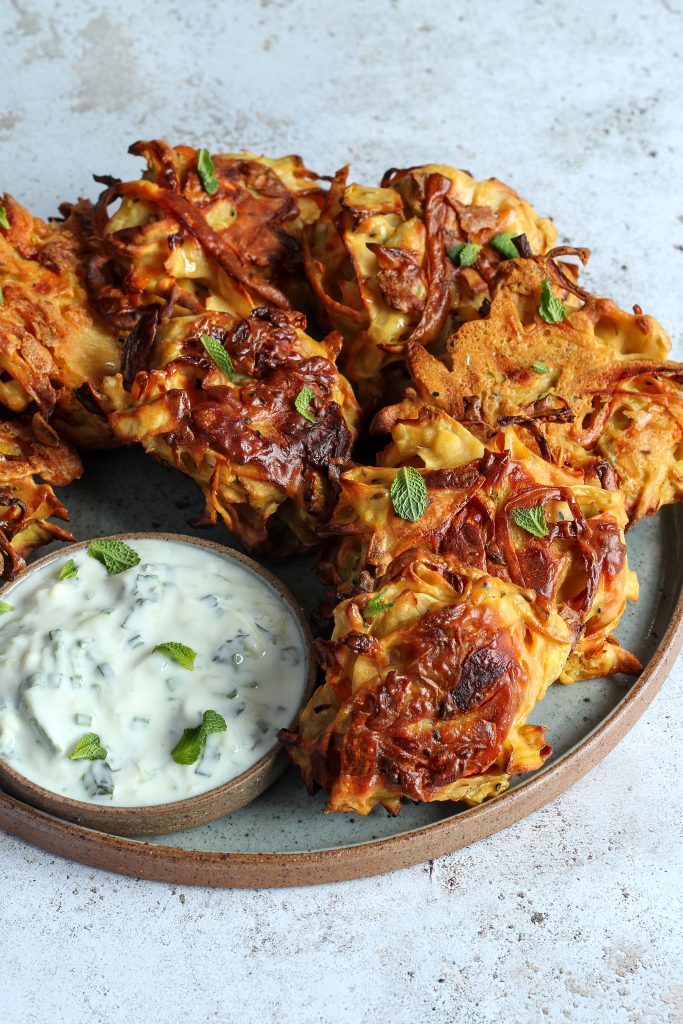
Use your leftover vegetable peelings from your Christmas Dinner to make these delicious No Waste Vegetable Fritters. They are so versatile in terms of what vegetables you want to use in them. I have used a combination of potato, parsnip, carrot and sprout peelings, but other suitable vegetables include onion, cabbage, kale, cauliflower (leaves included), broccoli, mushrooms or leeks.
Save the peelings in a Tupperware in the fridge for up to 3 days before making these fritters – you can adjust the gram flour (also known as chickpea flour or besan flour) and water to the weight of the vegetables.
Delicious served with a quick riata which can easily be adapted to vegan by using a plant-based yoghurt.
No Waste Vegetable Fritters
Makes around 8 fritters
Ingredients
2 tbsp rapeseed oil
400g vegetable peelings e.g. carrots, potatoes, parsnips and sprouts
1″ ginger, grated
1 clove garlic, grated
1 tsp nigella seeds
1.5 tsp cumin seeds
250g gram flour
Juice of 1 lemon
To serve
250g plain yoghurt of choice
100g grated cucumber
1 spring onion, chopped
1 handful fresh mint, chopped
Juice of half a lemon
Method
Preheat the oven to 200°C fan/ 225°C convection
In a large baking tray add the oil and preheat in the oven
In a large bowl add the remaining fritter ingredients and mix together with around 150ml water, adding extra water if needed to get a thick batter consistence.
Remove the tray from the oven and drop patties of the mixture into the hot oil, evenly spaced out. You should make around 7-8 fritters.
Cook in the oven for 10 minutes, before flipping over, gently pressing down and cooking for a further 12-15 minutes till golden brown and crispy.
Meanwhile, mix the raita ingredients together.
Once the fritters are cooked through, serve alongside the riata.
Per serving*: 198kcal/ 5.2g fat/ 0.7g saturated fat/ 25g carbohydrates/ 5.2g fibre/ 10g protein
No Waste Vegetable Fritters
*Nutritional analysis completed based on particular vegetables listed and plain low fat yoghurt.
A winter version of my no added sugar granola is sure to please in the cold weather; warming cinnamon is paired with sweet apples making for the perfect pick-me-up for dark mornings.
Cinnamon is a spice containing lots of polyphenols, a type of plant chemical which is thought to be beneficial to health. In total, this granola is packed full of 16 different plant foods, providing you with just over half of your weekly diversity goal in just the granola on its own.
If you don’t have all the specific ingredients, try swapping them to maintain fibre diversity. You could use alternative grains to those listed, or use different nuts which can change the healthy fat profile of this granola.
Makes 16 servings
Ingredients
100g stoned dates
150g oats
50g barley flakes
50g rye flakes
50g spelt flakes
15g ground sweet cinnamon
75 mixed seeds (I have used 15g each of chia, linseed, sesame, sunflower and pumpkin seeds)
80g almonds, roughly chopped
50g unsweetened desiccated coconut
50g extra virgin olive oil
30g coconut flakes
70g dried unsweetened apple
70g sultanas
Method
Preheat the oven to 120°C fan/ 130°C convection
Soak the dates in 150ml boiling water for a few minutes before blending into a smooth paste.
Meanwhile, mix the cereal flakes, cinnamon, seeds, almonds and coconut together.
Add the date puree and mix everything together.
Pour the oil in, mix, and then spread out onto a tray.
Bake for 90 minutes, stirring at minutes 30, 50 and 70.
Add the coconut flakes in for the last 20 minutes, before removing and allowing to cool.
Mix in the dried fruit and store in an airtight container.
Per 50g serving: 196kcal/ 6.4g fat/ 3.3g saturated fat/ 22.3g carbohydrates/ 5.8g fibre/ 5.4g protein