Blueberry sourdough bagels. Just a small amount of work and you will have the most delicious bagels – chewy crusts with a soft centre, filled with sweet and tangy blueberries which you know will do you good.
If you can’t find freeze-dried blueberries you can leave these out. Most shop-bought dried blueberries are sweetened with fruit juice and therefore won’t work as a replacement.
Makes 9 bagels
Ingredients
200g frozen blueberries
40g caster sugar
150g active starter, refreshed 10-12 hours before
500g bread flour
8g salt
75g freeze-dried blueberries (optional)
20g molasses (to make vegan) or honey
Rice flour for dusting
Method
Add the frozen blueberries to a large mixing bowl and pour over 200ml of boiling water. Allow the blueberries to thaw for 5 minutes.
Add the caster sugar and sourdough starter and mix.
Add the flour and salt, and mix in the bowl by hand for around 5 minutes before transferring to the work surface and kneading for a further 5 minutes. It will be sticky but keep working it.
Transfer back to the mixing bowl, cover and rest for 1 hour.
Top the dough back onto the work surface and knead for 1-2 minutes, adding the freeze-dried blueberries if using. Cover and prove at room temperature for 3 hours.
Divide the dough into 9 equal portions around 125g and shape into a tight ball, using rice flour to stop them from sticking. Allow to rest for 30 minutes.
Pinch the centre of each ball with your thumb and index finger, creating a hole. Then using both index fingers spin the dough around to create a bagel shape. Cover and rest in the fridge overnight, or for at least 8 hours.
The next day, set the oven to 220°C fan, bring a large pan of water to a boil, and add the molasses.
Boil each bagel for 30 seconds on each side before removing onto a wire cooling rack.
Bake on a lined tray for 18-20 minutes, till golden brown and nicely puffed up.
Delicious served with your favourite cream cheese and extra berries.
Sourdough Blueberry BagelsSourdough Blueberry BagelsSourdough Blueberry BagelsDelicious served with fresh berries for further added phytochemicals
Mix the levain, 500ml water and 15ml olive oil together before adding the flours and mixing to make a shaggy dough. Leave for 30 minutes covered.
Mix 12g of salt with 75ml water till dissolved, and pour over the dough, scrunching the dough with your hand to mix it in. The dough should look very rough and almost broken into small pieces. Cover and leave for 45 minutes.
Over the next few hours complete 4 sets of coil folds, allowing the dough to rest for 45-60 minutes between each fold.
Line and grease a large baking tray with olive oil. Gently transfer the dough to the baking tray and push the dough over the surface so it reaches the corners as best you can – there will be some resistance so don’t force it.
Cover the dough and leave in the fridge to slowly rise overnight – anywhere between 8-24 hours depending on your schedule
The next day preheat your oven to maximum temperature, add a small empty tray to the bottom of the oven for steam later, and remove the focaccia from the fridge.
Once the oven is up to temperature, uncover the dough and drizzle with a little olive oil. Using wet fingers, press your fingertips through the surface of the dough to create plenty of dimples before adding capers (with a little of their salt) and rosemary to the dimples.
Place the focaccia in the oven, adding water into the hot tray to create steam, closing the door as quickly as possible to trap the steam in, and reduce the oven temperature to 225°C fan/ 245°C convection for 20 minutes.
Remove the tray with water and bake for another 5 minutes* till the crust is golden.
Remove from the oven, and allow to cool on a wire rack.
A really easy toastie recipe with the added nutrition from chia seeds to make the quickest jam ever! The chia seeds soak up any liquid from the crushed blackberries, helping to thicken the juices so it works as a spread for the toastie, whilst adding a little extra fibre and healthy polyunsaturated fats. The sweet sharpness of the seasonal blackberries contrasts perfectly with the creamy brie, and the crunch of the sourdough.
1 tsp honey (optional if the berries are too tart)
1 tbsp extra virgin olive oil
Method
Mash the blackberries and chia seed together and leave for 5-10 minutes to thicken.
Once the jam is “set” spread it onto slices of sourdough, and top with slices of brie and honey if needed. Sandwich the second piece of bread over the top.
Heat a skillet over a low-medium heat and add 1/2 tbsp olive oil. Cook the toastie on one side for 3-5 minutes till golden brown. Brush the second side of bread with the remaining oil before flipping and cooking.
Serve immediately.
Blackberry & Brie Toastie
Per serving: 764kcal/ 41g fat/ 14g saturated fat/ 66g carbohydrates/ 9.3g fibre/ 27g protein
I’m still trying to savour the wild garlic season, and I love baking it into bread. You can freeze the bread and use it in the months to come so further preserve the flavour of it.
For more information about making sourdough and the various stages visit my page on sourdough bread.
Makes 2 x 9″ square tins, but you could bake one large, or make a very deep focaccia
Ingredients
150g levain, refreshed 8-12 hours earlier
15ml extra virgin olive oil plus extra for later
150g wholemeal bread flour
600g white bread flour
12g salt plus extra to top
A big bunch of wild garlic, roughly chopped – the more you put in the more garlicky the flavour
A few sprigs of rosemary (optional)
Method
Mix the levain, 500ml water and 15ml olive oil together before adding the flours and mixing to make a shaggy dough. Leave for 30 minutes covered.
Mix 12g of salt with 75ml water till dissolved, and pour over the dough, scrunching the dough with your hand to mix it in. The dough should look very rough and almost broken into small pieces. Cover and leave for 45 minutes.
Over the next few hours complete 4 sets of coil folds, adding the wild garlic in during the 2nd coil fold, allowing the dough to rest for 45-60 minute between each fold.
Grease two non-stick baking trays with olive oil (if not using non-stick line with baking parchment and add olive oil to the parchment). Tip out don’t the work surface and divide the dough into two. Gently transfer to the baking tray and push the dough over the surface so it reaches the corners as best you can – there will be some resistance so don’t force it.
Cover the dough and leave in the fridge to slowly rise overnight – anywhere between 8-24 hours depending on your schedule
The next day preheat your oven to maximum temperature, add a small empty tray to the bottom of the oven for steam later, and remove the focaccia from the fridge.
Once the oven is up to temperature, uncover the dough and drizzle with a little olive oil. Using wet fingers, press your fingertips through the surface of the dough to create plenty of dimples. Add rosemary to the dimples, sprinkle with a little extra salt and then flick water over the surface of your dough with your fingertips. Adding extra moisture will give a softer crust, so if you want a very crispy top omit this step along with the steam.
Place the focaccia in the oven, adding water into the hot tray to create steam, closing the door as quickly as possible to trap the steam in, and reduce the oven temperature to 225°C fan/ 245°C convection for 20 minutes.
Remove the tray with water and bake for another 5 minutes* till the crust is golden.
Remove from the oven, and allow to cool on a wire rack.
Wild Garlic Sourdough Focaccia
*if baking a thicker focaccia you may need an extra 5-10 minutes to fully cook the dough.
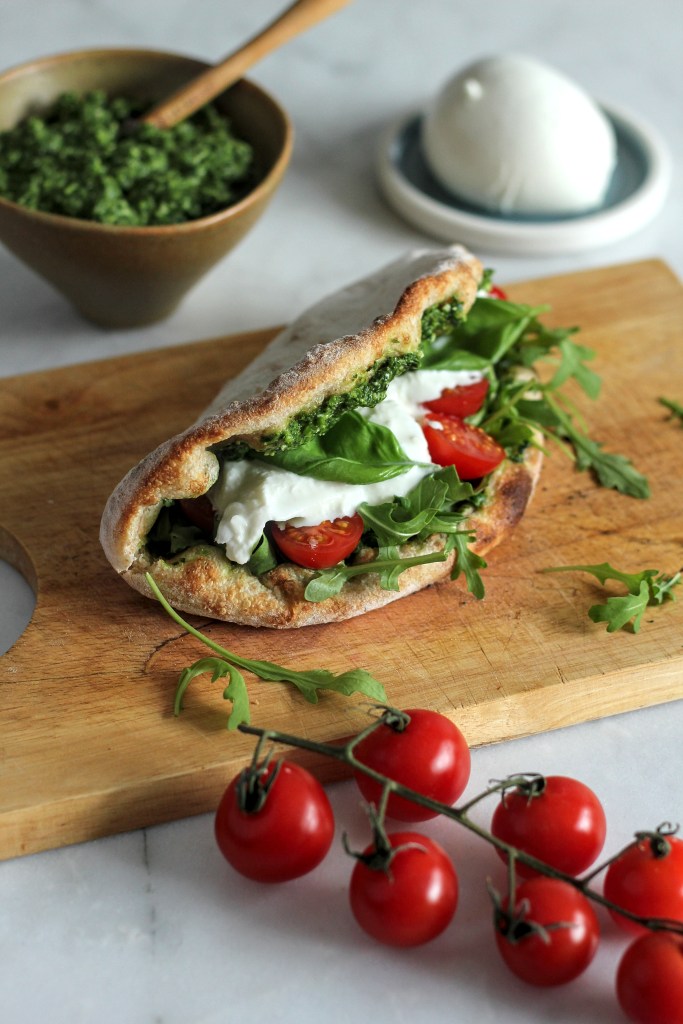
If you’ve been on Instagram for just a minute you will probably have seen these trending pizza sandwiches. They’re delicious. I highly recommend you make these! I’ve used my sourdough pizza base recipe, and then any surplus dough I used to make extra pizzas for easy mid-week dinners!
Serves 3
Ingredients
Half batch of sourdough pizza base, divided into 3 small balls, rested for 30 minutes before cooking (or make a full batch and use any leftover dough for pizzas)
Preheat the oven to maximum temperature with your pizza stone and allow to fully heat.
Use a little rice flour and shape the dough into a disk in the same way you would for a pizza. Brush half the surface with 1 tsp of the olive oil, and fold the unbrushed side over the top. Transfer to the pizza stone to cook for 6-8 minutes till golden and crispy.
Once cooked, generously spread the wild garlic pesto on the inside of the pizza dough, and fill with rocket, tomatoes, burrata and basil leaves.
If you ever have stale sourdough bread, here’s the easiest way to use it up. No food waste in this house, they keep in an airtight container for a few weeks ready to sprinkle on anything that needs and extra piece of crunch!
The recipe is super easy, I roughly uses 1 sprig of rosemary, 1 clove of garlic and 1 tablespoon of oil for every 100g of bread. But of course you can change this up according to your taste.
Ingredients
Sourdough bread, cut into 1″ cubes
Garlic cloves, crushes
Rosemary, roughly chopped
Olive oil
Method
Preheat the oven to 150°C fan/ 160°C convection
Mix the oil, garlic and herbs together in a large bowl. Add the bread cubes and mix to completely coat the cubes.
Transfer to a baking tray, spreading the cubes out and bake for 25-30 minutes, till golden brown and crispy.
Sprinkle over your favourite soups or salads, or allow to cool completely before storing in an airtight container.
I adore asparagus season, fleeting as it is. Therefore having it for breakfast seems the perfect way to enjoy the season to the max.
I love having asparagus soldiers dipped in a soft-boiled egg. But if I have the time I love nothing more than griddling it over a hot pan and serving it with a beautifully soft poached egg and some sourdough. For me this is the perfect springtime brunch.
Seasonal British asparagus also emits 5 times less CO2 in comparison to those transported from abroad. Therefore if you want to reduce your food carbon footprint, enjoy British asparagus in its peak season from mid-April to the end of May.
Serves 1
Ingredients
1 small bunch of fresh British asparagus
1 slice of sourdough
Extra virgin olive oil
1 egg
Butter (optional)
Salt and pepper
Method
Prepare the asparagus by snapping off the woody ends
Preheat a griddle pan
Oil one side of the sourdough and place on the griddle pan to cook.
Lightly oil the asparagus and place it in the griddle pan alongside the bread
Before flipping the bread, oil the second side.
Cook for a few minutes till charred
Meanwhile, bring a pan of water to a gentle simmer, gently swirl and poach the egg for 3-4 minutes depending on your taste
Assemble the asparagus on the sourdough, adding the optional knob of butter on the asparagus if desired before topping with the poached egg
Season with salt and pepper to your taste and enjoy
When I presented seeded multigrain sourdough bagels to my brother, the first thing he said was that I needed to make cinnamon and raisin sultanas. So grateful(!) but I took the constructive criticism and made this recipe for him.
I’ve adapted the Margot Bakery sourdough bagel recipe. It’s a great recipe, however, I could never fit 12 bagels onto my baking sheets, and the volume of dough was too large for my stand mixer! I also wanted to incorporate more wholemeal flour as a way of increasing the fibre content. I also didn’t have the malt syrup, so for anyone who wishes to make vegan bagels, swap the honey back out for the original malt syrup.
You could of course do the more traditional approach of cinnamon and raisin bagels, but I have always preferred sultanas over raisins. Other fruits that would work well in this recipes include dried blueberries, cranberries or cherries.
The bagels are best eaten fresh on the day, although still delicious if left for a day or two. A great way to capture that freshness is to slice the bagels in half and then freeze. This way they are ready to pop straight into the toaster from the freezer and are ready to be eaten within minutes.
Makes 12 bagels
Ingredients
For the leven
35g 50:50 strong white: strong wholemeal flour
115g 50:50 strong white: strong wholemeal flour
25g granulated sugar
For the dough
20g honey or malt syrup if making vegan
180g strong white flour
180g strong wholemeal flour
400g plain flour
12g salt
10g ground sweet cinnamon
120g sultanas
Extras
Vegetable oil
50:50 mix plain flour: rice flour
2 tsp bicarbonate of soda
Sourdough Cinnamon and Sultana Bagels
Method
The morning before making the bagels, refresh your starter with 35g 50:50 strong white: strong wholemeal flour and 35g water. Mix and leave for 10-12 hours.
The night before making the bagels, in a large jar mix 70g of the refreshed starter mixture, 115g 50:50 strong white: strong wholemeal flour, the sugar and 70g water. Leave for 10-12 hours.
The next day, mix all the remaining ingredients, 425g water and 250g of the refreshed starter. Knead the dough on a medium setting of a stand mixer fitted with a dough hook, frequently scraping down the sides and hook, for around 8-10 minutes. Alternatively, you can work the dough by hand, but it will be sticky so resist the urge to add extra flour. Knead for 10 minutes.
Lightly grease a 3l container. Transfer the dough, cover and allow to rest at room temperature for 3 hours.
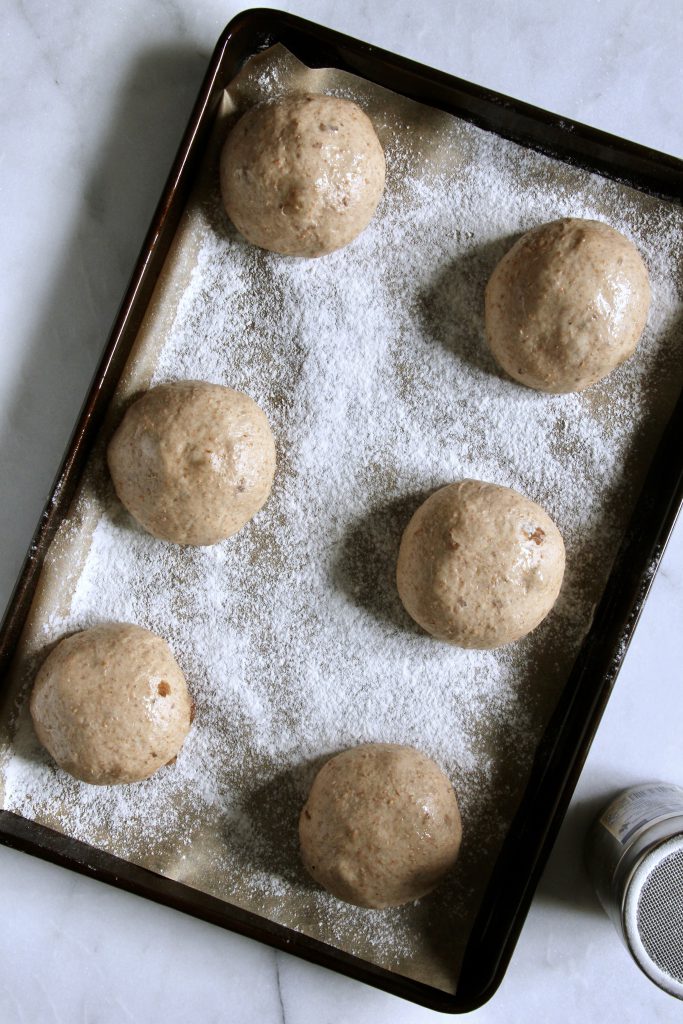
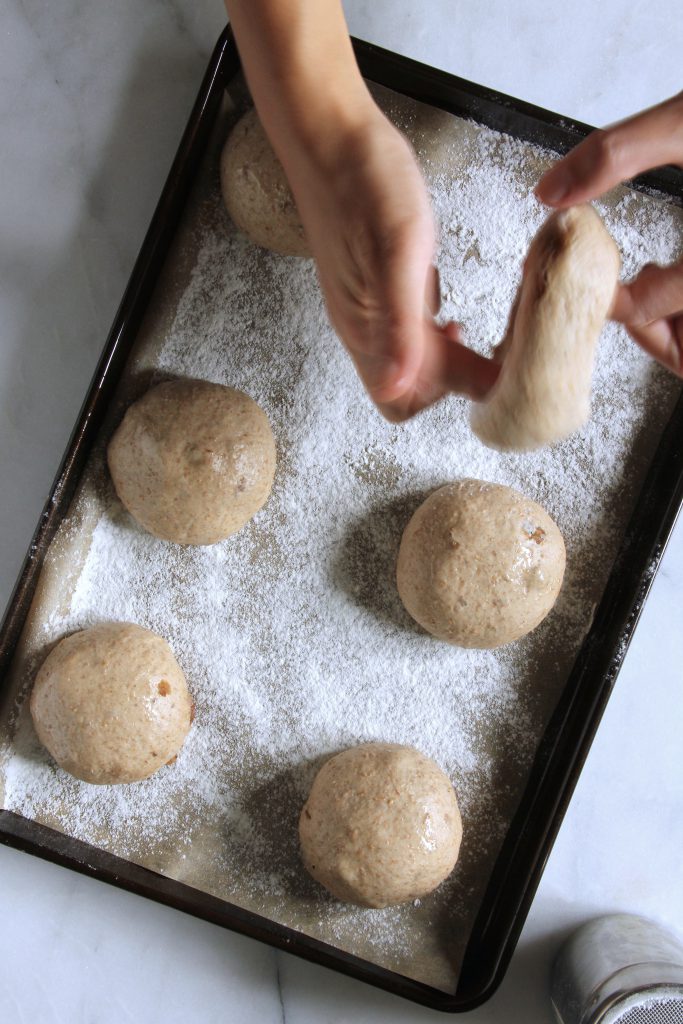
Line 2 large baking trays with baking parchment and dust with 50:50 rice and plain flour.
Divide the dough into 12 equal portions and roll out into neat balls. Try to tuck any sultanas into the dough to prevent burning when baking.
Place 6 balls evenly spaced out onto a tray and cover with lightly oiled clingfilm. Leave to rest for 1 hour at room temperature.
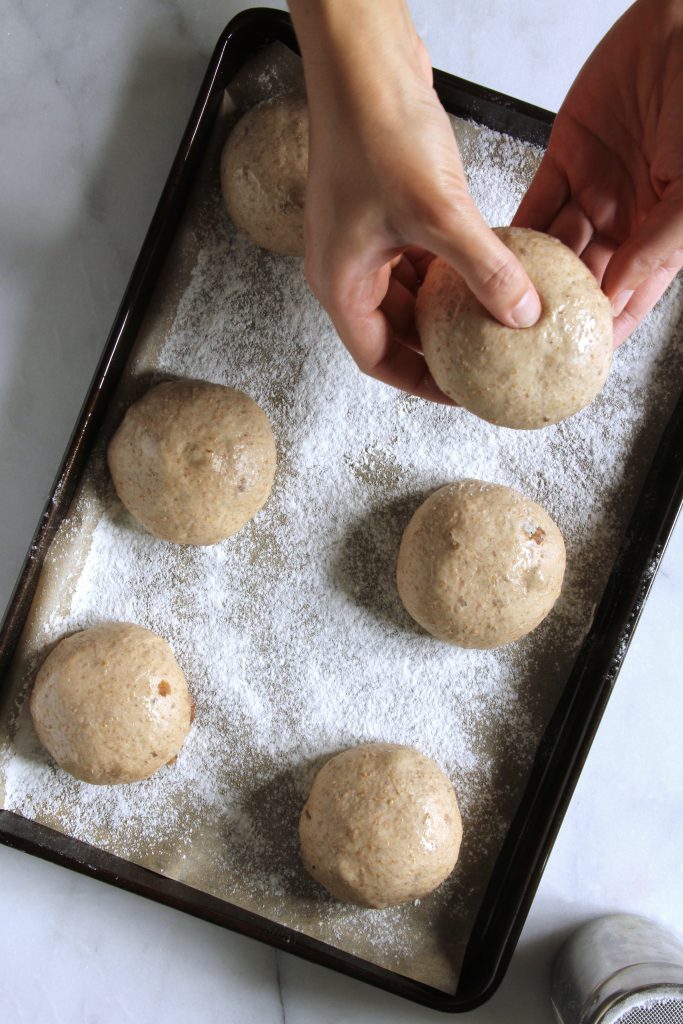
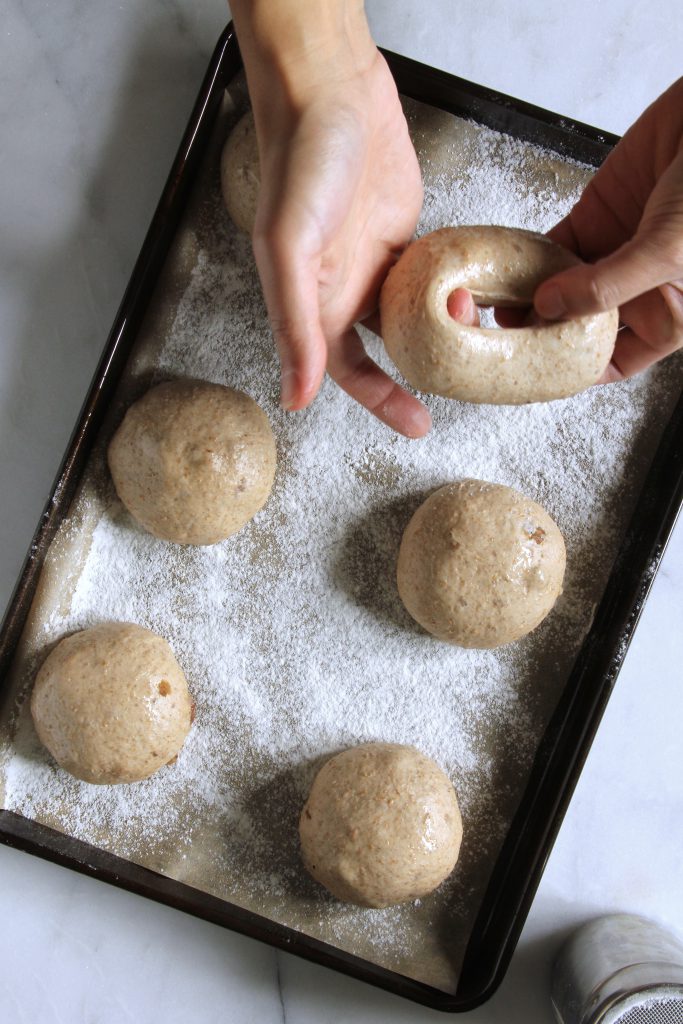
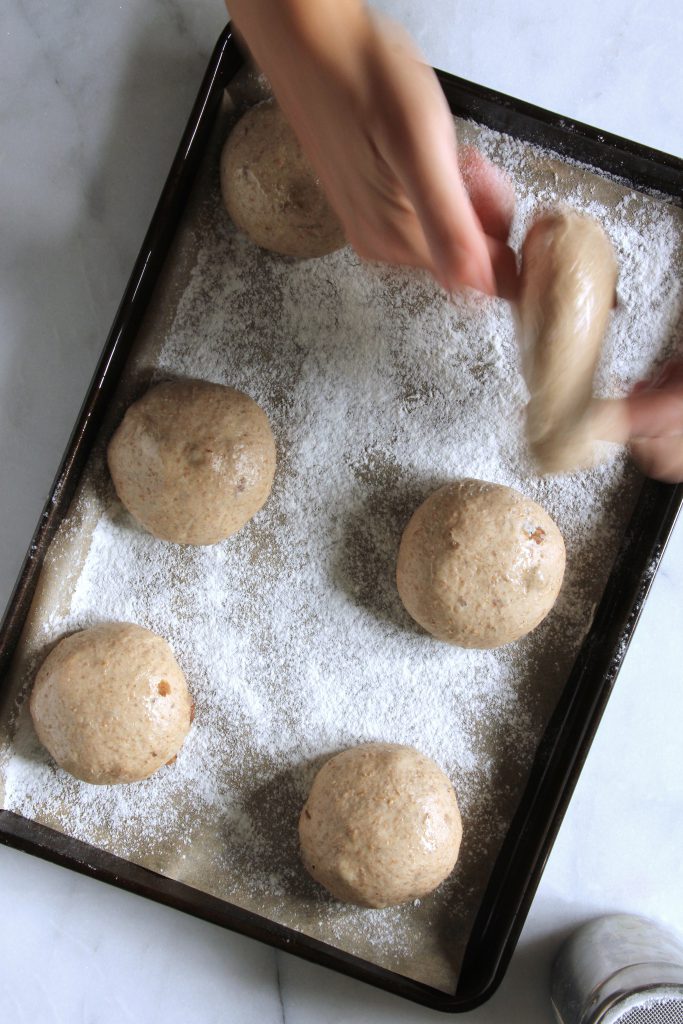
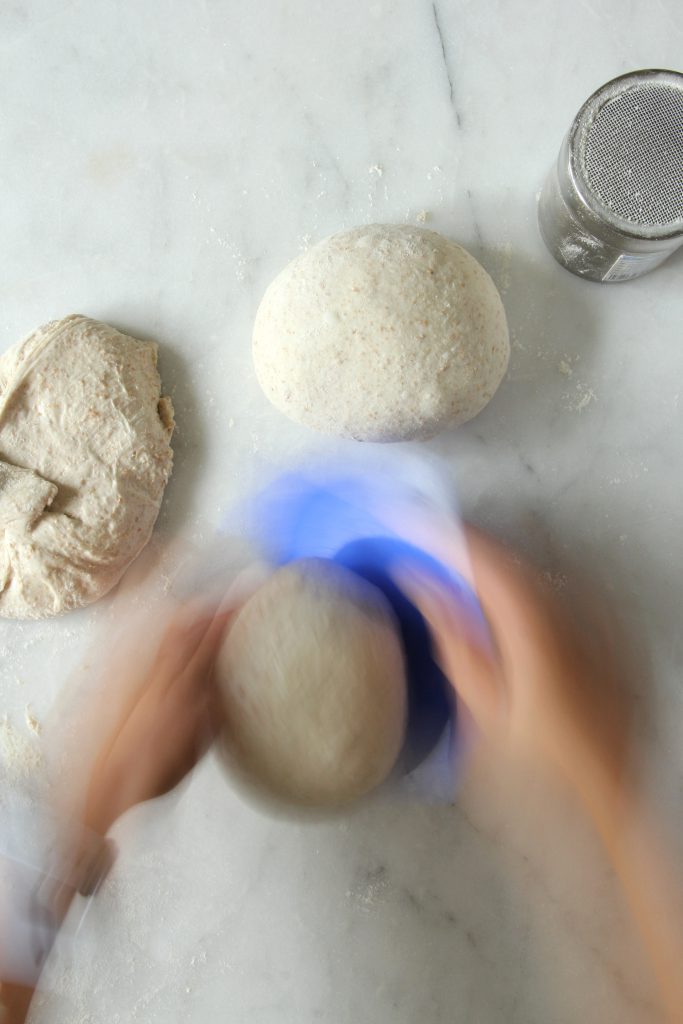
Peel back the clingfilm, take one ball and make a hole in the centre of the ball. Using two fingers, stretch the ball into a bagel shape using a winding motion. Redust the parchment with 50:50 rice and plain flour and place the bagel back down.
Repeat for the remaining 5 balls on the baking tray.
Starting back with the first bagel, repeat the winding stretch to open the bagel back up.
Cover back up with the oiled cling film and leave to prove at room temperature for 3-6 hours depending on the temperature of the room; in warmer weather prove for a shorter period of time.
Transfer to the fridge overnight for up to 24 hours.
The next day remove the bagels from the oven and allow to return to room temperature.
Preheat the oven to 220°C fan/240°C convection, place a tray in the bottom of the oven, and bring 2l of water to the boil in a large pan.
Once the water is boiling add the bicarbonate of soda.
Boil the bagels in batches of up to 3 depending on the size of your pan for 30 seconds.
Remove and allow to dry slightly on a wire rack before transferring to a clean baking sheet lined with baking parchment, allowing space for them to expand in the oven.
Boiled bagels ready for baking
Once all the bagels are boiled, boil 200ml water.
As quickly as possible, place the trays of bagels into the oven and pour the boiled water into the tray at the bottom of the oven.
Close the door to trap as much steam as possible. Reduce the temperature of the oven to 20°C and bake for 15 minutes.
After 15 minutes, remove the tray of water and if your bagels are on split levels, rotate your trays around for even cooking. Bake for a further 8-9 minutes.
Remove and allow to cool on a wire rack.
Per bagel: 205kcal/ 1.2g fat/ 0.2g saturated fat/ 41.2g carbohydrates/ 3.1g fibre/ 6.6g protein
I made this for my friend who is an avid supporter of my sourdough pizzas, simply to give her something different to try. She may have protested slightly at the thought of having a “salad pizza”, but at the end of a week’s stay with me in my lockdown food bubble, this turned out to be one of her favourite foods we ate. And we ate a lot of foods!
This is easily adaptable to be vegetarian by omitting the Parma ham, and was in part inspired by a famous pizza chain’s vegan pizza dish I saw an old colleague have some 15 years ago. I must admit that back then, before I had started my path down nutrition, the thought of a cheeseless salad pizza did not appeal in the way it would do now.
If you are vegan, the base pizza dough recipe is completely vegan. You can still top it with the salad and grilled peaches, and it would be delicious as is, but I suspect the vegan dairy-free alternative cheese would make a wonderful addition to it.
2 large ripe peaches or nectarines, cut into wedges
1 tsp extra virgin olive oil
80g rocket, watercress, baby leaf spinach or pea shoots
3 slices of Parma ham
1 ball burrata
Drizzle of balsamic glaze
Method
Preheat the oven to maximum temperature (mine is 275°C fan) and place a heavy bottom tray/pizza stone in the middle of the oven. Allow the oven to reach temperature and wait a further 10 minutes to ensure the tray is fully heated.
Dust the work surface with semolina, take a ball of dough and place it on the semolina and finely dust with flour.
Using your fingers, press around the edge 1 cm in to form a crust.
Using the palm of your hand, press inside this line to flatten the dough in the centre.
When you can press it no more, pick the dough up and using your knuckles, gently ease the dough out so it becomes thin and slightly transparent. Take care not to rip the dough. Ensure the base has an even covering of semolina.
Transfer the pizza base onto a pizza peel.
Add 100g passata over the base, up to but not on the crust part of the dough.
Transfer the pizza onto the tray in the oven using a strong and decisive forward and back motion to slide the pizza off the peel.
Cook the pizza for 6-7 minutes depending on the temperature of your oven. The pizza should have very dark golden blistered crusts, and the passata will have evaporated some of the liquid.
Meanwhile, heat a heavy-based griddle pan over a high heat.
Coat the peach wedges in the oil before grilling for 1-2 minutes per side.
Remove the pizza and allow to rest for 1 minute.
Scatter the pizza with the salad leaves and grilled peaches. Tear the Parma ham and evenly distribute over the pizza. Place the burrata ball in the centre and drizzle with the balsamic glaze.
Best eaten straight away.
Per serving: 756kcal/ 23.0g fat/ 11.4g saturated fat/ 88.7g carbohydrates/ 8.3g fibre/ 27.9g protein
Simple, classic, completely delicious. You could pimp it out with any toppings you wish, or just keep it as is.
The trick is to have a very thick pizza pan or a pizza stone. These retain the heat when you put the pizza on to cook, resulting in a crispy base. I use a cast iron pizza pan, which can seriously retain its heat.
Preheat the oven to maximum temperature (mine is 275°C fan) and place a heavy bottom tray/pizza stone in the middle of the oven. Allow the oven to reach temperature and wait a further 10 minutes to ensure the tray is fully heated.
Dust the work surface with semolina, take a ball of dough and place it on the semolina and finely dust with flour.
Using your fingers, press around the edge 1 cm in to form a crust.
Using the palm of your hand, press inside this line to flattern the dough in the centre.
When you can press it no more, pick the dough up and using your knuckles, gently ease the dough out so it becomes thin and slightly transparent. Take care not to rip the dough. Ensure the base has an even covering of semolina.
Transfer the pizza base onto a pizza peel.
Add 100g passata over the base, up to but not on the crust part of the dough.
Tear 50g buffalo mozzarella into large chunks and scatter over the passata.
Transfer the pizza onto the tray in the oven using a strong and decisive forward and back motion to slide the pizza off the peel.
Cook the pizza for anywhere between 6-9 minutes depending on the temperature of your oven. The pizza should have very dark golden blistered crusts, and the mozzarella and passata should be bubbling and start turning golden.
Remove the pizza, and scatter with fresh basil leaves.
Best eaten straight away.
Per whole pizza: 1028kcal/ 13.3g fat/ 7.2g saturated fat/ 145.4g carbohydrates/ 12.3g fibre/ 38.6g protein
Easy to make sourdough pizza bases which are almost foolproof. You will need a minimum of 4 hours to make the bases, but in cooler temperatures it may take a little longer. Alternatively you can make the dough over a longer period of time in increase the flavour complexity of the base by allowing a longer fermentation. You can choose what you prefer, I tend to go for a medium fermentation of between 6-8 hours to get the texture and flavour I personally enjoy for my pizzas.
Makes 3 pizzas
Ingredients
Starter
15g starter, refreshed 10-12 hours prior to use
25g strong wholemeal flour
25g strong white flour
For the dough
100g strong wholemeal flour
400g strong white flour
8g salt
Method
The night before making pizzas, mix the starter, flours and 50ml filtered water together in a jar. Leave for 10-12 hours at room temperature.
The next day, mix the two flours in a large flat bottomed dish.
Measure 300ml tepid water (25°C) and add 100g starter refreshed the night before. Mix till homogenous and add to the flour, mixing well.
Leave covered with a tea towel for 30 minutes.
Measure 75ml tepid water and add the salt, mixing till dissolved.
Add to the autolysed mixture and mix till evenly distributed.
Cover and leave for 45 minutes.
Complete 1 coil fold, cover, and rest for 45 minutes
Repeat 3 more coil folds 45 minutes apart.
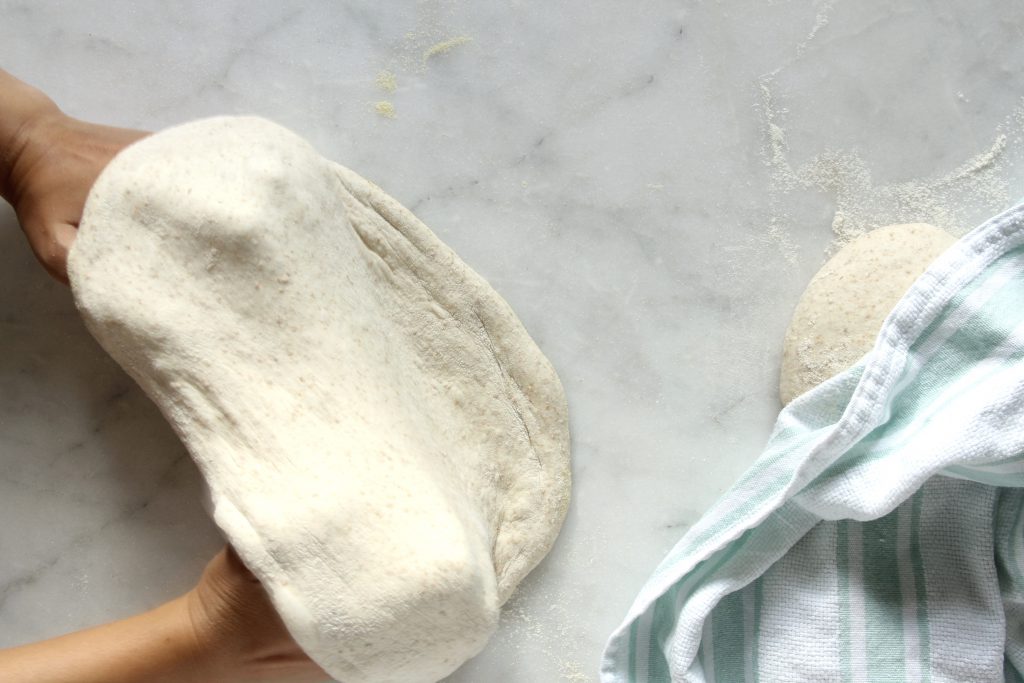
After resting for 45 minutes after the fourth coil fold, tip the dough out onto the work surface and dust liberally with a 50:50 mixture of rice flour and white flour.
Divide the dough into 3 equal portions and flip each portion so it is flour side down.
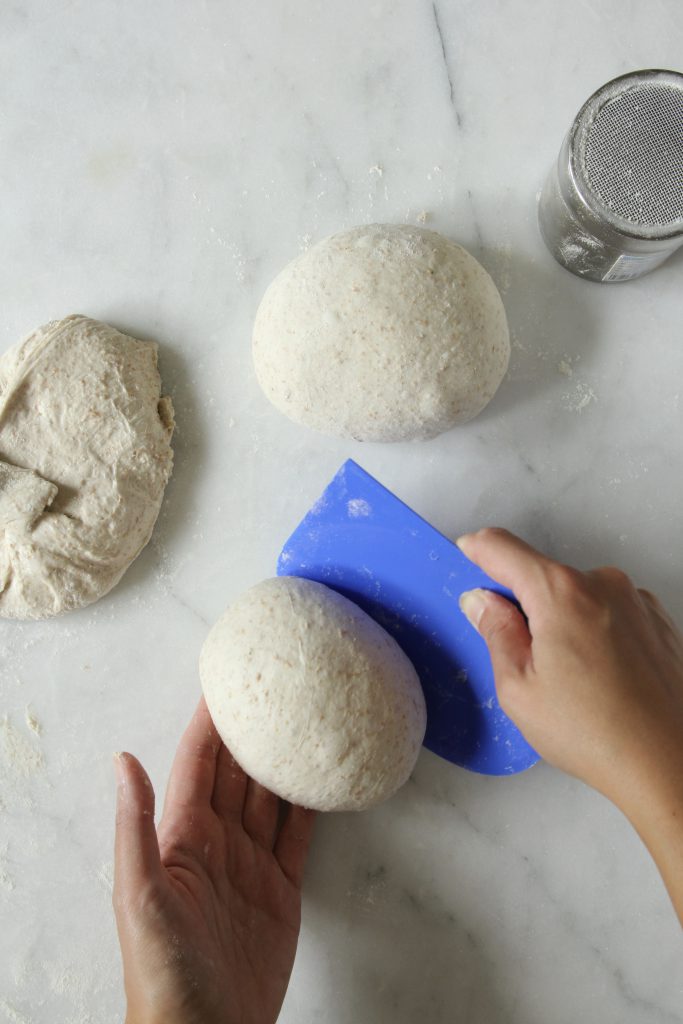
Working with one piece at a time, fold the corners into the centre, trying to incorporate as little flour as possible whilst creating tention in the skin. Use a dough scraper to help. Repeat with the remaining dough.
Place the dough balls on the dusted work surface and cover with a clean tea towel and leave to rest for 30 minutes.