Sourdough Croutons

Sourdough Bread

If you ever have stale sourdough bread, here’s the easiest way to use it up. No food waste in this house, they keep in an airtight container for a few weeks ready to sprinkle on anything that needs and extra piece of crunch!

The recipe is super easy, I roughly uses 1 sprig of rosemary, 1 clove of garlic and 1 tablespoon of oil for every 100g of bread. But of course you can change this up according to your taste.

Ingredients

  • Sourdough bread, cut into 1″ cubes
  • Garlic cloves, crushes
  • Rosemary, roughly chopped
  • Olive oil

Method

  • Preheat the oven to 150°C fan/ 160°C convection
  • Mix the oil, garlic and herbs together in a large bowl. Add the bread cubes and mix to completely coat the cubes.
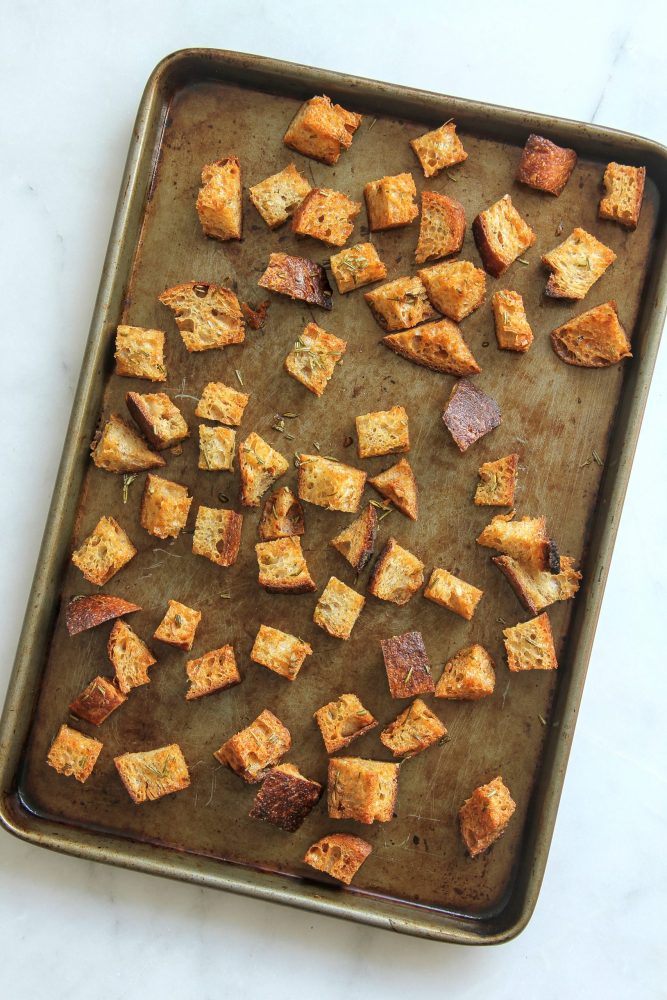
  • Transfer to a baking tray, spreading the cubes out and bake for 25-30 minutes, till golden brown and crispy.
  • Sprinkle over your favourite soups or salads, or allow to cool completely before storing in an airtight container.

Coffee, Banana and Vanilla Smoothie

We’re in the middle of a heatwave, and you’d be forgiven for thinking I had lost the plot as it may sound like a weird combination, but honestly you have to try it before you judge. I also think the secret is the perfect pairing is with the use of Alpro Soya Vanilla drink. Completely unendorsed, I fell in love with this product many moons ago whilst at university studying for my undergraduate nutrition degree and stumbled upon this. The combination of flavours which worked so well it became my signature drink of choice. Perfect as both breakfast on the go, or as a mid-morning snack along side a coffee pick me up when packaged away in a thermos flask to keep it nicely chilled.

It’s the perfect smoothie for a heatwave where you would love a coffee but don’t want a hot drink. Also great for preventing any banana wastage as once they start turning spotty brown simply peel and freeze in chunks ready to make this drink.

Each serving provides you with:

  • 1 of you 5 a day
  • 35% of your daily calcium requirements
  • 18% of your potassium requirements
  • Source of fluids for hydration

Serves 1

Ingredients

  • 1 banana, frozen overnight
  • 50ml coffee of choice
  • 200ml Alpro Soya Vanilla drink

Method

  • Place all of the ingredients in a high-speed blender till smooth.
  • Pour into a glass, or into a thermos flask to save for later.
Coffee, Banana & Vanilla Smoothie

Broad Bean and Mint Hummus

Do you like broad beans? I think they’re a little bit like Marmite, you either love them or hate them. And I also firmly believe that those leathery little jackets surrounding each green bean is responsible for so many people not liking them, including to some extent, myself. They’re currently in season (from the end of June to the middle of September) so why not pick up a bag.

Many people will peel each bean out of its leathery jacket, revealing a bright green bean inside. I, however, do not do this because it’s time-consuming, wastes food, but also impacts the nutritional content. Those papery jackets actually contribute to the phenolic compounds as well as the fibre content.

However, the good news is that I have a delicious recipe with doesn’t remove the skins which both saves time and also keeps the maximum nutrition of the beans in the dish. It’s delicious, I promise that if you’re a fan of hummus this is going to be right up your street.

Serves 10

Ingredients

  • 750g broad beans in their pods, or around 300g depodded
  • 45g tahini
  • 1 garlic clove
  • 15g chives, chopped
  • 3 sprigs of mint, leaves removed
  • juice of 2 large lemons (around 90ml)
  • 50ml extra virgin olive oil

To serve

  • Toasted sourdough
  • A few reserved cooked broad beans
  • Mint leaves
  • Olive oil

Method

  • Bring a large pan of water to a boil. Cook the broad beans for 2 minutes before draining and plunging them into iced water. Drain once cool, reserving a few for decoration if desired.
  • In a food processor, add the cooked broad beans with all of the remaining ingredients.
  • Blitz till the desired consistency, adding a little extra water if needed. I like mine a little chunky.
  • Serve on toast dressed with extra broad beans, mint and olive oil, or with crudites.
  • Any remaining hummus can be stored in an airtight container for 3 days in the fridge.

Per 50g serving: 97kcal/ 8.0g fat/ 1.1g saturated fat/ 3.2g carbohydrates/ 1.9g fibre/ 2.8g protein

St. Clement Hot Cross Buns

These citrusy hot cross buns are plant-based using vegetable oil and dairy-free milk to create an enriched dough without the use of dairy and eggs.

St. Clement Hot Cross Buns

Makes 9 buns

Ingredients

For the buns

  • 2 oranges, zest and juice
  • 100g sultanas
  • 100g strong wholemeal flour
  • 250g white strong flour
  • 30g rapeseed oil, plus a little extra
  • 7g yeast
  • 30g caster sugar
  • 50g mixed peel
  • 2 tsp ground mixed spice
  • 125ml milk, I have used unsweetened soya milk

For the crosses

  • 5ml rapeseed oil
  • 25g strong white flour
  • 25-30ml water

For the glaze

  • 50ml of reserved juice from the oranges
  • 15g sugar
  • pinch of ground mixed spice

Method

  • Zest and juice the oranges, reserving 50ml of the juice for later.
  • Weigh out the remaining orange juice and top up to 100ml if needed with water. Add the sultanas and allow to soak while you prepare the rest of the ingredients.
  • To a freestanding mixer bowl, add the flours, oil, yeast, sugar, mixed peel spices, soya milk and orange zest. Add in the orange juice and sultanas and knead for 5 minutes on a medium setting. Alternatively you can do this by hand but resist the temptation to add more flour – the dough should be ever so slightly sticky.
  • Lightly great a large bowl the oil, place the dough in and cover. Allow to double in size for 1-2 hours.
  • Knock the dough back and evenly divide into 9 balls.
  • Line a baking tin with baking paper and arrange the balls in a 3×3 format.
  • Cover and allow to double in size again, about 1-1.5 hours.
  • Once the dough has almost fully risen, preheat the oven to 200°C fan/ 220°C convection.
  • Prepare the batter by mixing the ingredients together to form a smooth pipeable mixture. Place into a piping bag.
  • Once the oven it up to temperature, pipe crosses over the tops of your buns.
  • Bake for 15 minutes.
  • Meanwhile, prepare the glaze by heating the orange juice, sugar and spices together till the sugar has dissolved.
  • Once the buns are cooked, generously glaze them, using all of the liquid.
  • Remove the buns from the tray onto a wire cooking rack, removing the baking parchment as well.
  • Best enjoyed fresh on the same day, or delicious toasted if a day or two old.

Per bun*: 254kcal/ 4.6g fat/ 0.4g saturated fat/ 46g carbohydrates/ 2.8g fibre/ 6.1g protein

*Analysis based on unsweetened soya milk

Roasted Tofu and Mediterranean Vegetables

I love this simple combination. It’s a great base for so many different dishes, and it’s perfect for Veganuary. Tofu is a good source of vegan protein, while also being a source of calcium if it’s been set with either calcium sulfate or calcium phosphate.

Other vegetables that work really well in this include:

  • Marrow
  • Squashes
  • Pumpkins
  • Mushrooms
  • Tomatoes
  • Onions
  • Garlic (roast in their skins)
  • Fennel
  • Leeks

No tofu? Here are your protein alternatives:

  • Chickpeas, either roasted or stirred in at the end
  • Tempeh
  • Halloumi (making the dish vegetarian)
  • Serve with hummus in a sandwich, salad or with cous cous

Serves 4

Ingredients

  • 2 aubgerines
  • 2 tbsp rapeseed oil
  • 1 large, or 2 small courgettes
  • 2 peppers
  • 1 block of firm tofu

Method

  • Preheat an oven to 180°C fan/200°C convection.
  • Add the oil to a large roasting tray.
  • Slice the aubergine into chunks and immediately toss in the oil.
  • Chop the remaining ingredients, add to the tray and mix together, seasoning with pepper.
  • Roast in the oven for 50-60 minutes, stirring halfway through, till the edges of the vegetables and tofu go golden.
  • Serve with your choice of carbohydrates such as lemon and herb cous cous or kale pesto pasta – swap the parmesan for nutritional yeast to make it vegan
Delicious served with lemon and herb cous cous, or pesto pasta

Store any leftovers in a sealed tupperware for up to 3 days in the fridge.

Yellow Split Pea Falafel

These little fritters have two main differences from the traditional falafel you would normally buy. Firstly their main ingredient is yellow split peas, as opposed to the traditional chickpea or fava bean. Secondly, they are baked in the oven rather than deep-fried. If neither of those facts have offended you then you’re in for a treat!

These make the perfect accompaniment to my easy hummus recipe to make a wrap, a nourish bowl or make large versions of the falafels and pop it in a burger bun for a vegan burger alternative.

Falafel and Hummus Salad Wrap

These falafel are packed full of nutrients, and each serving will provide you with:

  • 13g of plant protein
  • 18% of your fibre recommendation
  • 28+% of your daily iron requirements
  • 20+% of your zinc requirements
  • 10% of your calcium requirements

Serves 6

Ingredients

  • 200g yellow split peas, soaked overnight
  • 50g flat-leaf parsley, stems and leaves
  • 50g coriander, stems and leaves
  • 10g dill, stems and leaves
  • 1 medium red onion
  • 5 garlic cloves
  • 2 tsp cumin seeds
  • 1 tsp ground coriander
  • 1 tsp cayenne pepper
  • 1 tsp baking powder
  • 2 tsp sesame seeds
  • 120g gram flour
  • 3 tbsp extra virgin olive oil

Method

  • Cook the yellow split peas in fresh water for 30 minutes. Drain and allow to cool slightly.
  • Roughly chop the herb stems before adding all the ingredients into a food processor. Pulse till the desired texture of your falafels – I prefer mine to have some texture throughout.
  • Transfer to a bowl, cover and chill in the fridge for 1 hour.
  • Preheat the oven to 200°C fan/ 220°C convection. Place a heavy-bottomed tray in to preheat with the olive oil. Allow to come to temperature.
  • Meanwhile, take the cooled mixture and gently press into disk shapes. The mixture should make around 18-20 falafels depending on how big you make them.
  • Once the baking tray and oil are up to temperature, transfer the falafels in. As they hit the oil they should sizzle slightly.
  • Bake for 20-25 minutes, flipping halfway through once golden brown and crispy.

Per serving: 273kcal/ 9.3g fat/ 1.2g saturated fat/ 30g carbohydrates/ 5.4g fibre/ 13.2g protein

Easy Hummus

A super easy hummus recipe that can be ready in minutes. Use this as a healthy snack alternative, or as a component of a larger meal.

Chickpeas are good sources of plant-based iron, and the combination with lemon juice as a source of vitamin C means that the iron absorption from these sources will be increased; something that vegans and vegetarians will need to be aware of. Iron requirements differ according to sex and age; for pre-menopausal women a serving of hummus will provide 18% of iron requirements, whilst for men and post-menopausal women it’s over 30%.

Separately, chickpeas and sesame seeds, or tahini, in this case, are a good source of calcium. Each serving of hummus provides you with 8% of your daily calcium requirements, and that’s on its own. You could further increase the calcium content of your hummus meal by using broccoli crudités, or serving with brown or white bread which is fortified with calcium in the UK by law.

Makes 7 portions

Ingredients

  • 150g drained tinned chickpeas
  • 1 garlic clove, peeled
  • 45g tahini
  • 30ml extra virgin olive oil
  • Juice of 1 large lemon
  • ½ tsp ground cumin

To serve

  • Chickpeas
  • Extra virgin olive oil
  • Sesame seeds
  • Sumac
  • Vegetable crudités
  • Bread

Method

  • Add the chickpeas, garlic, tahini, olive oil, lemon juice and cumin to a food processor
  • Blend to your desired consistency, adding 1–2 tablespoons of water if needed
  • Serve in a bowl scattered with extra toppings such as cooked chickpeas, olive oil, sesame seeds and sumac with your favourite crudités
  • Any leftovers can be stored in the fridge in a covered container for three days

Per 45g serving: 114kcal/ 8.9g fat/ 1.2g saturated fat/ 4.0g carbohydrates/ 1.8g fibre/ 3.4g protein

For more information about key nutrients in vegan diets check out the blog I have written for MyNutriWeb.

Lentil, Mushroom and Almond Ragu

A delicious meal-free ragu alternative that won’t make you wonder where the meat is!

Serves 6

Ingredients

For the ragu

  • 2 tbsp extra virgin olive oil
  • 1 large onion, diced
  • 2 sticks of celery, diced
  • 2 carrots, scrubbed and diced
  • 2 cloves of garlic, finely diced
  • 250g mushrooms, diced
  • 60g skin-on almonds, chopped
  • 100g red lentils
  • 100g puy lentils
  • 1 stock cube
  • 200ml red wine (option to replace with water)
  • 400g tinned tomatoes
  • 2 tbsp tomato puree
  • 20g dried porcini mushrooms, roughly broken
  • 3 bay leaves
  • 10 spring of thyme
  • 3 sprigs of rosemary
  • 10 sage leaves, finely chopped
  • 10 sprigs of fresh basil, stems chopped (option to save some leaves for garnish)

To serve

  • 450g spaghetti
  • Nutritional yeast (vegan) or parmesan (vegetarian)
  • Fresh basil leaves

Method

  • In a large saucepan, add the oil, onion, celery and carrot. Cook for 5 minutes without browning.
  • Add the garlic, cook for 1 minute before adding the fresh mushrooms in. Cook for 5 minutes till the mushrooms have released and reabsorbed their liquid.
  • Add all the remaining sauce ingredients along with 600ml water. Bring to the boil and then gently simmer for 45 minutes.
  • In a separate pan boil water. Cook the pasts for 2 minutes less than the packet instructions.
  • Drain the pasta and return it to the pan, reserving some of the cooking liquid.
  • Add the ragu to the pasta and stir through, adding pasta water to loosen the ragu if needed. Cook for 1 minute over a low heat.
  • Serve immediately with nutritional yeast or parmesan and fresh basil leaves over the top.

Per serving: 599kcal/ 13g fat/ 1.6g saturated fat/ 81g carbohydrates/ 13g fibre/ 26g protein

Spicy Roasted Pumpkin Seeds

Still looking for ways to use up your pumpkin this year? I’ve covered using the skin and the flesh, so not it’s time to talk about seeds! I don’t even wash the seeds, contrary to what many other people suggest. This helps keep the recipe as simple as possible, and also means that any pumpkin fibres still attached will soak up any flavours added to them aka flavour bomb!

Pumpkin seeds are full of magnesium, phosphorus, vitamin K and manganese, as well as being a good source of antioxidants. In addition, carving pumpkin seeds are higher in fibre than standard green pumpkin seeds bought from the shop – another win for making your own!

These little seeds make the perfect snack on the go, or alternatively, use them to add textures to soups or salads.

You could roast them plain, but I love the little extra kick from the lemon and cayenne pepper – feel free to use more for a bigger kick, or substitute with chilli powder.

Ingredients

  • 150g pumpkin seeds
  • 1 lemon, zest and juice
  • 1 tsp smoked paprika
  • 1 tsp dried oregano
  • 1 tsp dried coriander
  • 1/4 tsp cayenne pepper (option to add more for a bigger kick, or use chilli powder)
  • 1/4 tsp white pepper

Method

  • Preheat the oven to 150°C fan/ 160°C convection
  • Mix all the ingredients together and lay them out on a baking tray
  • Bake the seeds for 30-40 minutes, mixing twice during the cooking time, till crispy and you can just hear them start to pop
  • Allow to cool before storing in an airtight container

Roasted Pumpkin and Cannellini Soup

This easy soup also doubles up as an easy pasta sauce – win win! It’s naturally vegan if using a suitable stock powder, and if you use a no added salt stock cube it is suitable for babies and toddlers.

Serves 6

Ingredients

  • 600g pumpkin, skin on and cubed
  • 2 large onions, cut into 8ths
  • 2 sticks of celery, chopped
  • 1 tin of cannellini beans
  • 4 garlic cloves, skin left on
  • 2 tbsp extra virgin olive oil
  • 700ml no added salt stock
  • 100ml boiling water
  • 20g pumpkin seeds, finely chopped if serving to young babies

Method

  • Add the pumpkin, onion, celery, beans, garlic and olive oil to a large roasting tray.
  • Mix well before roasting in a preheated oven set to 180°C fan/ 200°C convection, stirring halfway through.
  • Once cooked, remove the garlic from its skin.
  • Bring the stock up to the boil and add the roasted vegetables, deglazing the roasting tin with 100ml boiling water.
  • Bring the mixture back up to a boil before blending till smooth.
  • Serve with a sprinkle of pumpkin seeds.

Option to serve as a pasta sauce by stirring through freshly cooked pasta. Delicious with a sprinkle of nutritional yeast which is a great source of B vitamins and zinc.

Serve as soup, pasta or baby-led weaning pasta finger food

Per serving of soup: 175kcal/ 8.5g fat/ 1.3g saturated fat/ 17.0g carbohydrates/ 6.0g fibre/ 4.8g protein

Watermelon Ice Lollies

A super fun way of getting one of your 5-a-day in! “Watermelon” ice lollies made for a selection of fruits, are the perfect way to say cool in the summer, and if you have kids you can get them to help make them with the blending and pouring.

Using frozen strawberries helps cool the first mixture, making it slightly quicker to add the second layer. Additionally, using the frozen strawberries means you will get slightly smaller ice crystals, as it is semi-frozen, giving a slightly better mouthfeel when you come to eat it.

You can use whatever yoghurt you like, making it vegan or dairy-free if you wish to.

Makes 4 lollies

  • 100g frozen strawberries
  • 200g watermelon
  • 8 teaspoons of yoghurt of choice
  • 1 kiwi, peeled
  • 1/2 a splice of Galia melon

Method

  • Blend the strawberries and watermelon together till smooth. Pour into lolly moulds, filling them up to 3/4 full.
  • Freeze for 30-45 minutes.
  • Layer 2 teaspoons of yoghurt over the watermelon layer.
  • Freeze for 30 minutes
  • Blend the kiwi and Galia melon till smooth. Layer onto the yoghurt to the fill line.
  • Inset the lolly mould and freeze for at least 8 hours or overnight.
binary comment

Tomato Salsa

This bright and refreshing salsa can be loaded onto a stack of nachos, or used as a dip. It’s really easy to make but definitely best eaten on the same day as it is made. You can increase the spice level to your own taste, and keep it mild by leaving the fresh chilli out and just using a few jalapeños instead.

Serves 4

Ingredients

  • 1/2 a red onion, finely diced
  • 1/2 a chilli (or to taste), finely sliced
  • 2 large tomatoes, deseeded
  • 5-6 pickled jalapenos (or to taste)
  • 1/2 a bunch of coriander
  • 1 lime
  • 2 tsp extra virgin olive oil

Method

  • In a large pestle and mortar, add the onion, chilli and a pinch of salt. Pound till the onions and chilli are half turned into a paste.
  • Dice the tomatoes and roughly chop the jalapenos and coriander. Add to the onion mix with the olive oil and juice of half a lime.
  • Mix together and check the seasoning, adding more lime juice or coriander to your taste.
  • Serve with chips or vegetable crudites

Create the perfect dip selection by also making some guacamole and some easy refried beans.