Vegetable and Tofu Gyoza

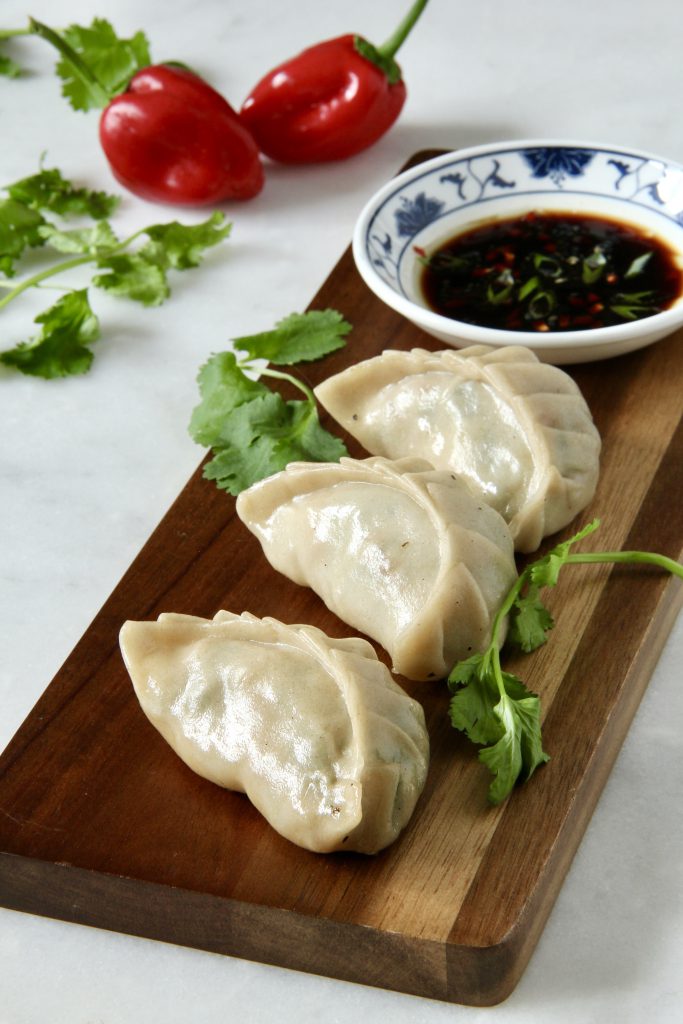
These easy to make dumplings look rather impressive. They also happen to be vegan, but if you wish you can add other flavours to the mix such as oyster sauce, fish sauce, or replace the tofu with an alternative source of protein.

If you want, you can also make a large batch of dumplings and freeze them. Simply line a baking tray with baking parchment and arrange the dumplings so they don’t touch. Freeze and then place into bags for up to 3 months. You can cook them straight from frozen, just add an extra few minutes onto the steaming time to make sure they are piping hot in the centre.

These little dumplings are delicious served with a simple dipping sauce made from soy sauce, sesame oil and rice wine vinegar. You can also add other flavours such as chilli, spring onion or sesame seeds. Alternatively, they are amazing dipped in some shop bought hoisin sauce!

Serves 3 as a starter

Ingredients

  • 1 portion of dumpling skins
  • 2 dried shiitake mushrooms, soaked and finely diced. Reserve the soaking liquid
  • 100g firm tofu
  • 30g cabbage, finely sliced
  • 30g carrot, finely diced
  • 30g bamboo shoots, finely sliced
  • 1 spring onion, finely chopped
  • 10g coriander, finely chopped
  • 1/2 tsp fresh ginger, very finely diced
  • 1 tsp sesame oil
  • 1 tsp Shaoxing wine
  • 2 tsp light soy sauce
  • 1 tsp cornflour
  • 1/2 tsp rapeseed oil

Method

  • Mix all of the ingredients, except the rapeseed oil, and 2 tablespoons of the reserved shiitake mushroom liquid together. Gently heat in a pan or wok till the cabbage has softened and the liquid has become slightly thick so it coats all the ingredients, about 2-3 minutes. Add extra mushroom liquid if needed.
  • Allow the mixture to cool to room temperature.
  • Take 1 dumpling skin and fill it with a heaped teaspoon of the mixture. Pinch the end and then pleat the top half of the skin onto the bottom half of the skin to create a slight crescent shape.
  • Add the rapeseed oil to your frying pan to stop the dumplings from sticking, and arrange them so they have at least 1 cm between each dumpling. You may need to cook them in batches depending on the size of your pan.
  • Cook for 2-3 minutes over a low-medium heat so they are golden on the bottom. Then add hot water to cover the bottom third of the dumpling and immediately cover with a lid to steam the dumplings.
  • After 5 minutes, remove the lid and allow any remaining liquid to evaporate off, allowing the bottoms to crisp for 1 minute.
  • Remove the dumplings onto a plate and enjoy hot with a dipping sauce of your choice.

Per serving: 230kcal/ 5.8g fat/ 1.3g saturated fat/ 33.2g carbohydrates/ 3.6g fibre/ 9.7g protein

Tomato and Pine Nut Sauce

Using my homegrown sun-ripened tomatoes and pairing it with pine nuts makes for the most delicious and creamy sauce, yet is completely vegan! Perfectly paired with freshly cooked pasta, you could also use it over roasted vegetables, marinated cuts of meat, fish, or tofu, or spread it over freshly toasted bread to make a quick bruschetta.

Any left overs can be stored in the fridge in an airtight container for up to a week, or frozen for up to 3 months.

Makes 4 servings

Ingredients

  • 2 large onions, finely diced
  • 1 tbsp extra virgin olive oil
  • 500g tomatoes, roughly diced
  • 1 bunch of fresh basil, leaves and stalks
  • 50g pine nuts

Method

  • Cook the onions and oil together over a low heat till the onions become translucent and soft.
  • Add the tomatoes and roughly chopped basil stalks, bringing to a light boil over a medium-low heat. Keep cooking till the volume has reduced by a third and the mixture becomes thicker, about 20 minutes.
  • Meanwhile, lightly toast your pine nuts under the grill for a few minutes, turning frequently to prevent them from burning. Keep them lightly golden to retain their natural sweetness.
  • Add the basil leaves and pine nuts to the tomato mixture and blend till smooth.

Per serving: 163kcal/ 13.0g fat/ 1.2g saturated fat/ 8.3g carbohydrates/ 2.4g fibre/ 3.4g protein

Sourdough Pizza Base

Easy to make sourdough pizza bases which are almost foolproof. You will need a minimum of 4 hours to make the bases, but in cooler temperatures it may take a little longer. Alternatively you can make the dough over a longer period of time in increase the flavour complexity of the base by allowing a longer fermentation. You can choose what you prefer, I tend to go for a medium fermentation of between 6-8 hours to get the texture and flavour I personally enjoy for my pizzas.

Makes 3 pizzas

Ingredients

Starter

  • 15g starter, refreshed 10-12 hours prior to use
  • 25g strong wholemeal flour
  • 25g strong white flour

For the dough

  • 100g strong wholemeal flour
  • 400g strong white flour
  • 8g salt

Method

  • The night before making pizzas, mix the starter, flours and 50ml filtered water together in a jar. Leave for 10-12 hours at room temperature.
  • The next day, mix the two flours in a large flat bottomed dish.
  • Measure 300ml tepid water (25°C) and add 100g starter refreshed the night before. Mix till homogenous and add to the flour, mixing well.
  • Leave covered with a tea towel for 30 minutes.
  • Measure 75ml tepid water and add the salt, mixing till dissolved.
  • Add to the autolysed mixture and mix till evenly distributed.
  • Cover and leave for 45 minutes.
  • Complete 1 coil fold, cover, and rest for 45 minutes
  • Repeat 3 more coil folds 45 minutes apart.
  • After resting for 45 minutes after the fourth coil fold, tip the dough out onto the work surface and dust liberally with a 50:50 mixture of rice flour and white flour.
  • Divide the dough into 3 equal portions and flip each portion so it is flour side down.
  • Working with one piece at a time, fold the corners into the centre, trying to incorporate as little flour as possible whilst creating tention in the skin. Use a dough scraper to help. Repeat with the remaining dough.
  • Place the dough balls on the dusted work surface and cover with a clean tea towel and leave to rest for 30 minutes.

Sourdough Crackers

Sourdough crackers which use up all the left over sourdough discard, meaning that between each preparation of the leaven for baking, the discarded sourdough starter can be turned into their own item and reduce food waste. Simply store all the unused starter in a clean container in the fridge, topping it up as you make more starter. You can keep adding starter for around 2 weeks to save up enough to make these crackers.

Another great thing about this recipe is that it’s so forgiving, you can use whatever flours you happen to have in your cupboard. This way you can increase the fibre diversity for your weekly tally by using different grains such as spelt, rye or wholegrain flours. Some flours absorb more water than others, and depending on how wet your starter discard is will determine exactly how much flour is needed for the dough.

Mix up the cracker flavours by adding in different ingredients. The below recipe is a simple seeded recipe, but the addition of nigella seeds will give a savoury flavour, or top with a little grated cheese over the top before cutting a baking to make a cheese topped cracker.

I keep my crackers very rustic looking. I simply roll out the dough and then run a pizza cutter through to make rough squares. You could of course jazz up their appearance by using a biscuit cutter to make specific shapes, or perhaps make them more seasonal with those cookie cutters you bought but never seem to get around to using…..!

If you want to ensure you have flat crackers without air bubbles in them, prick them with a fork before baking. This will allow any trapped air to be released rather than bubbling up and creating a pillow shaped cracker.

Makes around 40 crackers

Ingredients

  • 175g sourdough discard
  • 125g flour of choice (I have used equal portions of spelt, rye and khorasan)
  • 30ml extra virgin olive oil
  • 30 mixed seeds of choice (I have used poppy, linseed and sesame)

Method

  • Add the starter, flour and oil in a bowl and mix together to combine. The mixture should be firm but pliable and not stick to your hands – add more flour or water depending on how it feels.
  • Mix the seeds in and knead the dough lightly for a few minutes till smooth. Cover and rest for 30 minutes.
  • Preheat the oven to 180°C fan/ 200°C convection.
  • Divide the ball into 2 and roll out to around 2mm thickness, using a little extra flour to stop the dough from sticking.
  • Cut into the desired cracker shape and size and place onto a baking sheet.
  • Bake for 10-15 minutes till golden brown and crispy.
  • Allow to cool completely before storing in an airtight container for up to 1 month.

Coconut, Elderflower and Strawberry Chia Pudding

A super easy pudding which tastes so creamy yet so light and tasty. Using seasonal summer flavours, you can adapt this recipe to whatever is in season. If you don’t drink alcohol, try making it using cordial alone.

I very lightly fermented my coconut milk in my kefir grains at room temperature for 4 hours. This gives a very mild probiotic kick to the pudding, but if you don’t have your own kefir grains, or follow a vegan diet, you can just use the milk as it is.

I also keep the strawberry hulls on the whole strawberries for decoration. When I remove strawberry hulls for aesthetics, I either give the chickens a treat, or keep them in the freezer to later add to smoothies for an extra fibre diversity kick!

Serves 2

Ingredients

  • 40g chia seeds
  • 240ml coconut milk or any other milk of choice
  • 2 tbsp elderflower cordial
  • 240g strawberries plus extra for decoration
  • 2 tbsp elderflower liquor

Method

  • Mix the chia seeds, coconut milk and elderflower cordial together and leave to set in the fridge for 45 minutes.
  • Meanwhile, finely dice the strawberries and mix with the elderflower liquor.
  • Layer the chia seed mix into two glasses, layer the marinated strawberries over the top and garnish with whole strawberries, hulls and all!
Coconut, Strawberry and Elderflower Chia Pudding

Per serving: 228kcal/ 7.7g fat/ 2.4g saturated fat/ 29.9g carbohydrates/ 8.9g fibre/ 5.2g protein

Miso Aubergine with Crispy Chickpeas

Miso is a kitchen shortcut to a deep umami flavour boost for so many different dishes. My miso aubergine in influenced by the Nobu miso black cod. I’ve changed up a few ingredients to make it slightly healthier, and this works on cod too, so for those who eat fish, you can make the same marinade, but cook the fish for less time, around 15-18 minutes depending on the size of your fillets.

If you can get sake, the traditional Japanese rice wine, that would be true to the Japanese miso cod recipe. However, if you are unable to get it, Chinese rice wine is a good substitute, as is a dry white wine.

This dish is delicious served with steamed brown and wild basmati rice, garlic ginger dressed pak choi and quick pickled carrots for further fibre diversity!

Ingredients

  • 30ml sake
  • 30ml mirin
  • 5ml rice wine vinegar
  • 2 tbsp white miso paste
  • 20g stoned dates
  • 1 large aubergine
  • 200g tinned chickpeas, drained
  • 1 tsp EVOO
  • 1 tsp toasted sesame seeds
  • 1 spring onion, finely sliced
  • Chilli to taste, finely diced
  • Coriander leaves

Method

  • Mix the sake, mirin, rice wine vinegar, miso paste, dates and 20ml water into a small pan. Cook over a low heat till the dates have softened and the alcohol has cooked off. Blend to a smooth paste.
  • Slice the aubergine in half and score the fresh in diamond shapes, ensuring you do not cut through the skin. Place in an oven-proof dish.
  • Pour the miso sauce over the cut side of the aubergine and gently open up the cuts to allow the marinade to penetrate into the flesh. Leave to marinade to 30 minutes at room temperature, or put in the fridge if making in advance.
  • Preheat the oven to 200°C Fan, 220°C convection, gas mark 6.
  • Add the chickpeas and oil to the pan with the aubergine and gently toss in any excess marinade. Add 30ml water to the pan.
  • Cook for 30 minutes, mixing the chickpeas after 15 minutes. If the chickpeas look like they might burn add a little extra water.
  • Remove from the oven and scatter with sesame seeds, spring onion, chilli and coriander.

Per serving 288kcal/ 6.6g fat/ 0.9g saturated fat/ 37.9g carbohydrates/ 10.1g fibre/ 11.8g protein

Yellow Split Pea Curry

Yellow split peas are such a versatile bean. So simple to cook and they make a really mean curry as would any lentil.

Yellow split peas are also extremely high in fibre, containing around 16g fibre per 100g cooked peas. In comparison, red lentils provide 6g fibre, and green lentils 8.7g when cooked.

Yellow split peas also retain a firmer texture when cooked, even for a long period of time. This means that they won’t fall apart, so you always get a rewarding chunky texture to your dish.

Serves 6

Ingredients

  • 2 tbsp vegetable oil
  • 2 large onions, sliced
  • 4 cloves garlic, roughly chopped
  • 20g ginger, roughly chopped
  • 2 tbsp tomato puree
  • 2 tsp ground turmeric
  • 2 tsp garam masala
  • 2 tsp chilli powder (or to taste)
  • 200g yellow split peas
  • 200g fresh tomatoes, roughly chopped
  • 1 large aubergine, roughly chopped
  • 1 courgette, roughly chopped
  • 300ml coconut milk
  • 30g coriander, chopped

To Serve

  • Lemon wedges
  • Cooked rice
  • Kefir naan

Method

  • Soften the onion in the oil till translucent but not brown.
  • Crush the garlic and ginger in a pestle and mortar and add to the onions. Cook for 2 minutes before adding in the tomato puree, dried spices, split peas, tomatoes, aubergine and courgette. Add 600ml water and simmer for 40 minutes till the peas are cooked through.
  • Add the coconut milk 5 minutes before serving.
  • Sprinkle in the coriander and serve with a wedge of lemon.

Per serving 334kcal/ 16.1g fat/ 1.6g saturated fat/ 25.4g carbohydrates/ 19.4g fibre/ 14.0g protein

Slow Roasted Tomatoes

These tomatoes are so delicious and their flavours are concentrated due to the slow and low cooking. Additionally, the lycopene content of slow-roasted tomatoes is increased due to concentration from loss of water, as well as a break-down of cellular structures which helps release the lycopene and make it more bioavailable for us to absorb. Lycopene is a compound found in many fruits and vegetables, and is responsible for the colour of many yellow, orange and red fruits and vegetables and has been linked with improved cardiovascular outcome, alongside other health benefits including cancer.

Ingredients

  • 600g tomatoes, large tomatoes sliced in half
  • 10 sprigs of herbs of choice (I have used golden oregano and marjoram)
  • 4 cloves of garlic, skin on
  • 1 tbsp extra virgin olive oil

Method

  • Preheat the oven to 100°C fan, 110°C convection, gas mark 1/4
  • Lay the tomatoes out on a large baking tray in a single layer with the herbs and garlic cloves. Drizzle over the olive oil onto all the tomatoes and slowly roast in the oven for 3 hours till sticky and concentrated.
  • Remove and use immediately, or store in a container in the fridge for up to 5 days.

No Added Sugar Berry and Coconut Granola

Granola doesn’t last long in my house. Whenever I make a tray, it will be gone within a few days. Seriously. It’s such a delicious way to get a variety of plant-based foods into the diet. In fact, the below recipe contains 15 plant-based foods, that’s half of your weekly recommended target. So this granola is really a winner!

In addition, each portion of granola contains 5.7g fibre. It also had another bonus of no added sugar. Instead, I used dates and blend them with hot water to create a sweet puree which helps the clusters form together. This also means it’s not overly sweet and feels much lighter than other generic granolas.

Using a variety of different cereal flakes also helps increase diversity; these are widely available at your local supermarket or health food shop. I’ve used jumbo oats with some rye, spelt and barley flakes which help increase the fibre content as well as the diversity of my weekly plant food intakes.

I’ve have used freeze-dried fruits in this granola. This means that they have been dried under cold conditions which are thought to help maximise the retention of heat-sensitive nutrients such as vitamin C, some B vitamins as well as phytochemicals and antioxidants. If you don’t have these to hand you can use other dried fruits such as raisins or apricots, or try adding some dehydrated vegetables for an extra fibre kick.

Makes 15 servings

Ingredients

  • 100g pitted dates
  • 150g oats
  • 50g rye flakes
  • 50g barley flakes
  • 50g spelt flakes
  • 50g desiccated coconut
  • 75g mixed seeds (chia, pumpkin, sunflower, sesame, and linseed)
  • 80g almonds, roughly chopped
  • 50ml Extra Virgin Olive Oil (EVOO)
  • 40g coconut chips
  • 35g freeze-dried raspberries
  • 35g freeze-dried blueberries

Method

  • Preheat the oven to 120°C Fan/130°C convection or Gas Mark 1/2.
  • Pour 150ml boiling water onto the dates and allow them to soak.
  • Meanwhile, mix all the oats, flakes, desiccated coconut, seeds, and nuts in a bowl.
  • Using a hand blender or a food processor, blend the dates in the water to a puree. Empty into the dry ingredients and mix.
  • Add the EVOO and mix together. Pour onto a large baking tray and, using the back of a spoon, press the granola down to form clumps.
  • Cook in the oven for 90 minutes in total, gently turning the granola at 30, 50, and 70 minutes.
  • At 70 minutes add the coconut flakes to the mixture before cooking for the final 20 minutes.
  • Remove from the oven and allow to cool fully before adding in the freeze-dried raspberries and blueberries and storing in an airtight container.

Per 50g serving: 206kcal/ 7.8g fat/ 4.4g saturated fat/ 21.3g carbohydrates/ 5.7g fibre/ 5.7g protein

Smokey Chipotle Mixed Bean Stew

Looking to increase the diversity of the foods you eat? This is the perfect dish for you, you can add any other vegetables you wish, and serve it with different carbohydrates to further increase the variety of the plant based foods in your diet. I had a tin of 6 different mixed beans, this is a fantastic way to quickly boost your weekly plant variety. If you don’t have a mixed tin, try combining different tins, or use dried lentils to maxmise diversity. This specific recipe gives you 17 different plant foods on its own, and per serving provides 25% of your daily fibre recommendation. So why not try adding a few extra plant foods when serving it as a meal to further boost these numbers.

It’s also a big batch food which can be stored in the fridge for a few days or frozen down as a convenience food for a later date. You can thank me later!

Serves 8

Ingredients

  • 2 tbsp EVOO
  • 3 onions, sliced
  • 3 sticks of celery, diced
  • 4 cloves garlic, diced
  • 2 peppers, chopped
  • 1 courgette, chopped
  • 1 can mixed beans, drained and rinsed
  • 1 can chickpeas, drained and rinsed
  • 2 tins of tomatoes
  • 2 tsp smoked paprika
  • 2 tsp chipotle
  • 6 oregano sprigs
  • Juice of 1 lime

Method

  • Sweat the onions in the oil for 5 minutes till translucent. Then add the celery followed by the garlic and cook for a further 3 minutes.
  • Add the remaining ingredients and 400ml of water. Bring to the boil and then gently simmer for 45-60 minutes stirring occasionally till the liquid has reduced by half.
  • Remove the woody stems of any herbs and serve.
Delicious served with wholegrain rice, sour cream, fresh coriander and a squeeze of lime

Per serving: 159kcal/ 5.2g fat/ 2.9g saturated fat/ 18.4g carbohydrates/ 7.5g fibre/ 7.1g protein

Jerusalem Artichoke and Carrot Soup

Jerusalem artichokes are high in prebiotic inulin, which gives rise to their nickname of fartichokes! They are delicious and earthy, and are surprisingly versatile. Treat them like a potato; boiled, mashed, roasted or sautéed in a pan. Additionally they can also be treated like a water chestnut, eaten raw grated over salads or quickly cooked in a stir fry so they maintain a crunch. Get them while you can, they go like hot potatoes and are only in season during winter months.

Serves 4

Recipe

  • 1 tbsp rapeseed oil
  • 1 onion, finely diced
  • 4 sticks celery, finely diced
  • 4 garlic cloves, finely sliced
  • 500g Jerusalem Artichokes, peeled and roughly chopped
  • 4 carrots, roughly chopped
  • 10g stock powder
  • 10 sprigs thyme
  • 850ml water

Method

  • Gently fry the onion in the oil till soft and translucent. Add the celery and garlic and cook for a further 2 minutes without browning.
  • Add the artichokes, carrots, thyme, stock and water and bring up to a gentile simmer for 20 minutes. Remove any hard herb stalks.
  • Remove from the heat and bend till smooth.

Optional extra: gently fry sage leaves in butter or olive oil till crispy and serve over the top.

Per serving 144kcal/ 4.5g fat/ 0.6g saturated fat/ 23.8g carbohydrates/ 7.3g fibre/ 3.5g protein

Roasted Carrot and Yellow Split Pea Hummus

Visiting the historical town of Winchester, we decided to stop for lunch at Hugh Fearnley-Whittingstall’s River Cottage Kitchen. We shared a starter of a mixed mezze board, but the single dish that stood out from the board for me was the carrot and yellow split pea hummus.

I haven’t been able to stop thinking about it, it may have been the best hummus I have ever had. So I trawled through Hugh’s books to find a recipe, but alas, there were none to be found. So I have endeavoured to make my own.

Cooked Yellow Split Peas

Split peas are a great addition to your diet, naturally low in fat, high in plant-based protein and a source of fibre. We can often forget about including beans and pulses in as part of our weekly plant food diversity, but we should be aiming to eat from all 6 categories of plant-based foods; fruits, vegetables, nuts, seeds, whole grains, and legumes. This particular recipe covers 4 out of the 6 groups, and by adding some wholegrain crackers, perhaps even topped with nuts you could maximise the diversity of your diet.

Serves 6

Recipe

  • 100g split yellow peas
  • 2 carrots, washed and chopped into large pieces
  • 2 cloves garlic, skins on
  • 30g tahini
  • 40ml extra virgin olive oil
  • 90ml water (you may need more or less depending on the texture you wish for)
  • 1/2 tsp ground cumin
  • 1/2 tsp ground turmeric
  • 30g flat leaf parsley, roughly chopped
  • Juice of a lemon
  • Salt and pepper to taste

To serve

  • Fresh Parsley leaves
  • Nigella seeds
  • Vegetable crudites e.g. carrots, radish, cauliflower
  • Crackers

Method

  • Wash the split peas in cold water, then top with 500ml water and bring to the boil for 10 minutes before lowering the heat to a gentile simmer for 25 minutes. Drain and allow to cool.
  • When the peas are simmering, roast the carrots and garlic cloves in the oven preheated to 180 ° C/170 ° C Fan/GM4 for 20 minutes. Allow to cool.
  • Add the cooked peas, carrots and garlic clove, removing the skin, to a food processor. Add the tahini, extra virgin olive oil, lemon juice, water, spices and parsley and blend. Season to taste and add more water if the dip remains too thick.
  • Serve sprinkled with nigella seeds and fresh parsley leaves.

Per serving 107kcal/ 3.6g fat/ 2.0g saturated fat/ 11.6g carbohydrates/ 3.1g fibre/ 5.3g protein